First Steps
This section provides an easy to understand, simple example of creating and deploying a configuration group to an SD-WAN router. This helps to get familiar using Network-as-Code to manage Catalyst SD-WAN.
The repository used in this example can be found at: https://github.com/netascode/nac-sdwan-simple-example
This example assumes you have installed the following prerequisites.
- Terraform 1.8.0 or later.
- Git
- Your preferred text editor / Integrated Development Environment (IDE) (such as VisualStudio Code)
Getting Started
Section titled “Getting Started”Start by cloning the repository to your local system:
git clone https://github.com/netascode/nac-sdwan-simple-example.gitOpen the folder in your preferred editor / IDE.
The working area should look like this (the editor shown here is vsCode):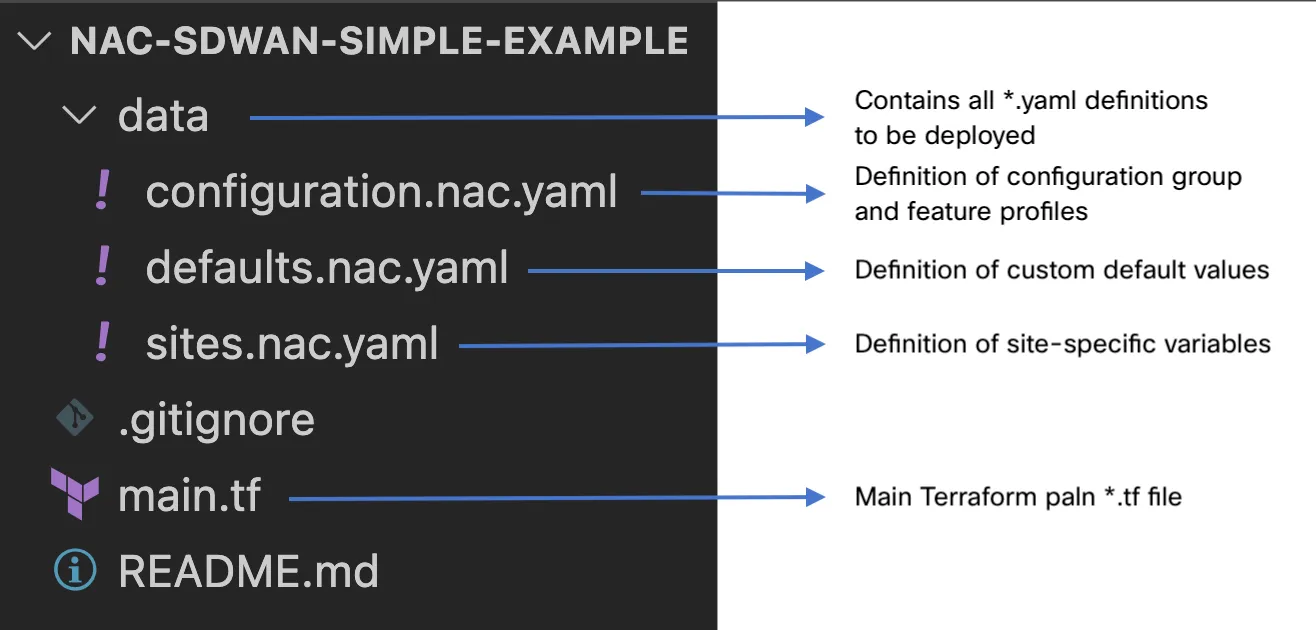
The main.tf file contains the required providers, provider settings and points to the location of all *.yaml file definitions.
module "sdwan" { source = "netascode/nac-sdwan/sdwan" version = "1.3.0" yaml_directories = ["data"]}Configuration Group and Feature Profiles Definition
Section titled “Configuration Group and Feature Profiles Definition”An example configuration group and feature profiles definition is provided in data/configuration.nac.yaml. This contains minimal configuration required to deploy a configuration group to a router.
Before diving into this file it is worth to understand the *.yaml files and structure in the data folder a bit better. As different teams might be responsible for different parts of the infrastructure, these definitions need to be flexible. Some organisations might want to use a single *.yaml file for their entire configuration, whilst others prefer *.yaml file per country, administrative domain or feature (e.g. network features and security features). The name of the yaml files are completely arbitrary. These two examples are explained below.
It is possible to group multiple WAN interfaces in the same *.yaml file. This yaml file contains two interfaces inet and mpls for WAN VPN.
cat configuration.nac.yaml---sdwan: feature_profiles: transport_profiles: - name: transport wan_vpn: name: wan_vpn ethernet_interfaces: - name: inet interface_name_variable: inet_interface_name - name: mpls interface_name_variable: mpls_interface_nameSimilarly it is possible to split the configuration of WAN VPN interfaces into multiple *.yaml files. The two yaml files refer to the same WAN VPN wan_vpn but contain different interfaces inet and mpls.
cat wan_vpn_inet.nac.yaml---sdwan:  feature_profiles:    transport_profiles:      - name: transport        wan_vpn:          name: wan_vpn          ethernet_interfaces:            - name: inet              interface_name_variable: inet_interface_name
cat wan_vpn_mpls.nac.yaml---sdwan:  feature_profiles:    transport_profiles:      - name: transport        wan_vpn:          name: wan_vpn          ethernet_interfaces:            - name: mpls              interface_name_variable: mpls_interface_name
Sites Definition
Section titled “Sites Definition”An example configuration group attachment definition with site-specific variables is provided in data/sites.nac.yaml. This defines which configuration group should be used by each router and provides values for variables required by the configuration group.
cat sites.nac.yaml---sdwan: sites: - id: 1 routers: - chassis_id: C8K-3D1A8960-6E76-532C-DA93-50626FC5797E configuration_group: branches device_variables: host_name: edge1 system_ip: 10.0.0.1 site_id: 1 pseudo_commit_timer: 300 inet_interface_name: GigabitEthernet1 mpls_interface_name: GigabitEthernet2As described before, the file structure is flexible. You can have all sites/routers defined in a single *.yaml file or split site/routers definitions into multiple files based on country, site type, site role etc.
Now that you are familiar with the structure it is time to get into the example.
Step 1: Configuration Group Validation
Section titled “Step 1: Configuration Group Validation”Navigate to data/configuration.nac.yaml and take note of the structure. This example contains a configuration group named branches, feature profiles system and transport and required features inside the feature profiles. The transport has two WAN interfaces defined, both configured for dynamic IPv4 address.
---sdwan: configuration_groups: - name: branches # Make sure there is no existing configuration group named 'branches' system_profile: system transport_profile: transport feature_profiles: system_profiles: - name: system # Make sure there is no existing profile named 'system' aaa: name: aaa users: - name: admin password: YudmqT6MWZyak3M basic: name: basic bfd: name: bfd logging: name: logging global: name: global omp: name: omp transport_profiles: - name: transport # Make sure there is no existing profile named 'transport' wan_vpn: name: wan_vpn ethernet_interfaces: - name: inet interface_name_variable: inet_interface_name ipv4_configuration_type: dynamic shutdown: false tunnel_interface: color: biz-internet - name: mpls interface_name_variable: mpls_interface_name ipv4_configuration_type: dynamic shutdown: false tunnel_interface: color: mplsNavigate to data/sites.nac.yaml and take note of the structure. This example has single C8000V router assigned to a configuration group.
---sdwan: sites: - id: 1 routers: - chassis_id: C8K-3D1A8960-6E76-532C-DA93-50626FC5797E configuration_group: branches configuration_group_deploy: true device_variables: host_name: edge1 system_ip: 10.0.0.1 site_id: 1 pseudo_commit_timer: 300 inet_interface_name: GigabitEthernet1 mpls_interface_name: GigabitEthernet2Step 2: Configuration Group Deployment
Section titled “Step 2: Configuration Group Deployment”Make sure to update the provider block in the main.tf file in the root folder with the right credentials and Catalyst SD-WAN Manager IP address. For more information see: Terraform Provider Documentation.
provider "sdwan" { username = "username" password = "password" url = "https://sdwan-manager.url"}Initialise Terraform: (This initializes the working directory containing the terraform configuration files, and installs all required providers and modules. This could take several minutes depending on the available bandwidth, as all the Network-as-Code modules are downloaded automatically.)
terraform initRun terraform apply: (This applies the changes defined by your Terraform configuration to create, update or destroy resources)
terraform applyFollowed by yes to approve.
Upon success you should receive the following output:
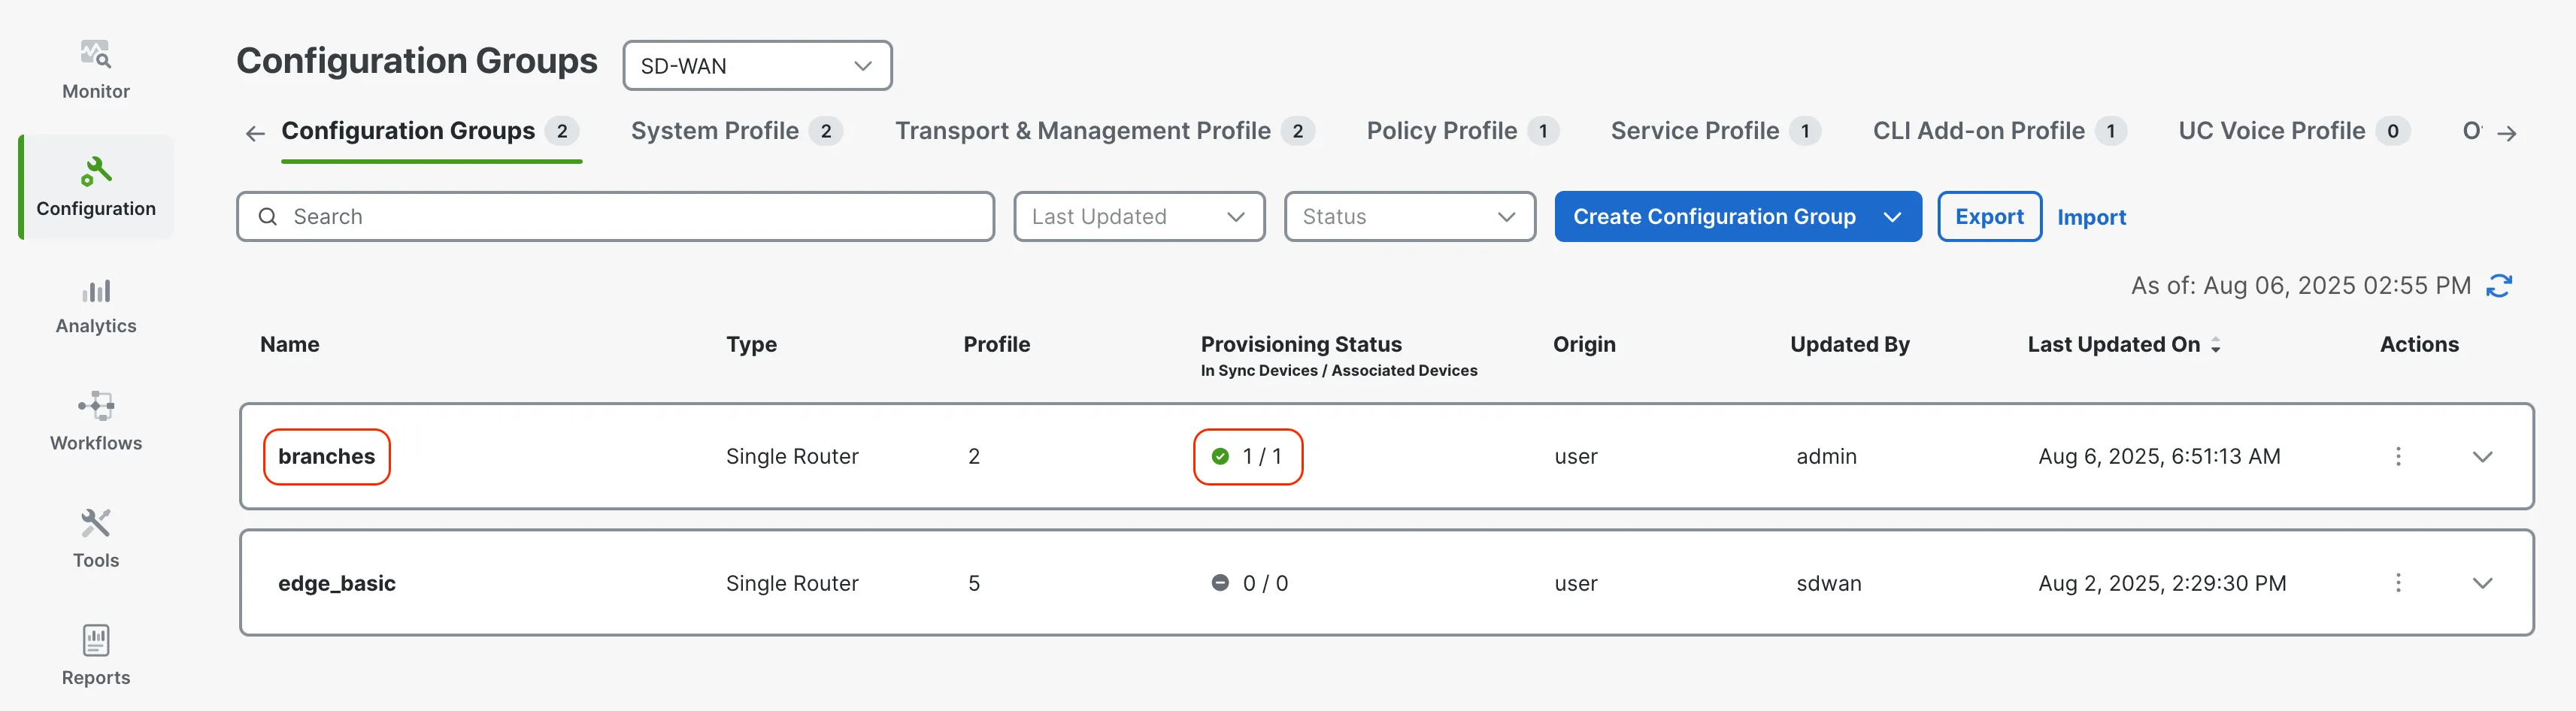
Apply complete! Resources: 12 added, 0 changed, 0 destroyed.Navigate to your SD-WAN Manager and verify that your configuration group branches has been deployed successfully:
Before expanding on additional use-cases it is worth understanding how you can add and remove resources. This will be covered in step 3 and 4.
Step 3: Adding additional resources
Section titled “Step 3: Adding additional resources”Now that the new configuration group is deployed it becomes easy to add additional features to configuration group. Add a new ntp feature by adding the following lines to the system feature profile section in configuration.nac.yaml:
sdwan: feature_profiles: system_profiles: - name: system ntp: name: ntp servers: - hostname_ip: ntp.example.comThe configuration.nac.yaml file with the new NTP feature should look like this:
---sdwan: configuration_groups: - name: branches system_profile: system transport_profile: transport feature_profiles: system_profiles: - name: system ntp: name: ntp servers: - hostname_ip: ntp.example.com aaa: name: aaa users: - name: admin password: YudmqT6MWZyak3M basic: name: basic bfd: name: bfd logging: name: logging global: name: global omp: name: omp transport_profiles: - name: transport wan_vpn: name: wan_vpn ethernet_interfaces: - name: inet interface_name_variable: inet_interface_name ipv4_configuration_type: dynamic shutdown: false tunnel_interface: color: biz-internet - name: mpls interface_name_variable: mpls_interface_name ipv4_configuration_type: dynamic shutdown: false tunnel_interface: color: mplsSave the file and run terraform apply
terraform applyTerraform will compare the state file with the new plan and calculate any resources that need to be added, changed or destroyed. In this case 1 new resources will be created and 1 resource will be updated. Terraform will create a new NTP feature and trigger a change on the configuration group so the new configuration including NTP will be pushed to the device attached to this configuration group.
Output:
Terraform used the selected providers to generate the following execution plan. Resource actions areindicated with the following symbols:  + create  ~ update in-place
Terraform will perform the following actions:
  # module.sdwan.sdwan_configuration_group.configuration_group["branches"] will be updated in-place  ~ resource "sdwan_configuration_group" "configuration_group" {      ~ feature_versions    = [            # (4 unchanged elements hidden)            "0",          + (known after apply),            "0",            # (3 unchanged elements hidden)        ]        id                  = "590b6d06-953b-47ee-bfcf-00f5fe62440b"        name                = "branches"        # (4 unchanged attributes hidden)    }
  # module.sdwan.sdwan_system_ntp_feature.system_ntp_feature["system-ntp"] will be created  + resource "sdwan_system_ntp_feature" "system_ntp_feature" {      + feature_profile_id = "2f5ff543-034b-418d-b552-94737cde0dc0"      + id                 = (known after apply)      + name               = "ntp"      + servers            = [          + {              + hostname_ip_address = "ntp.example.com"            },        ]      + version            = (known after apply)    }
Plan: 1 to add, 1 to change, 0 to destroy.
Followed by yes to approve.
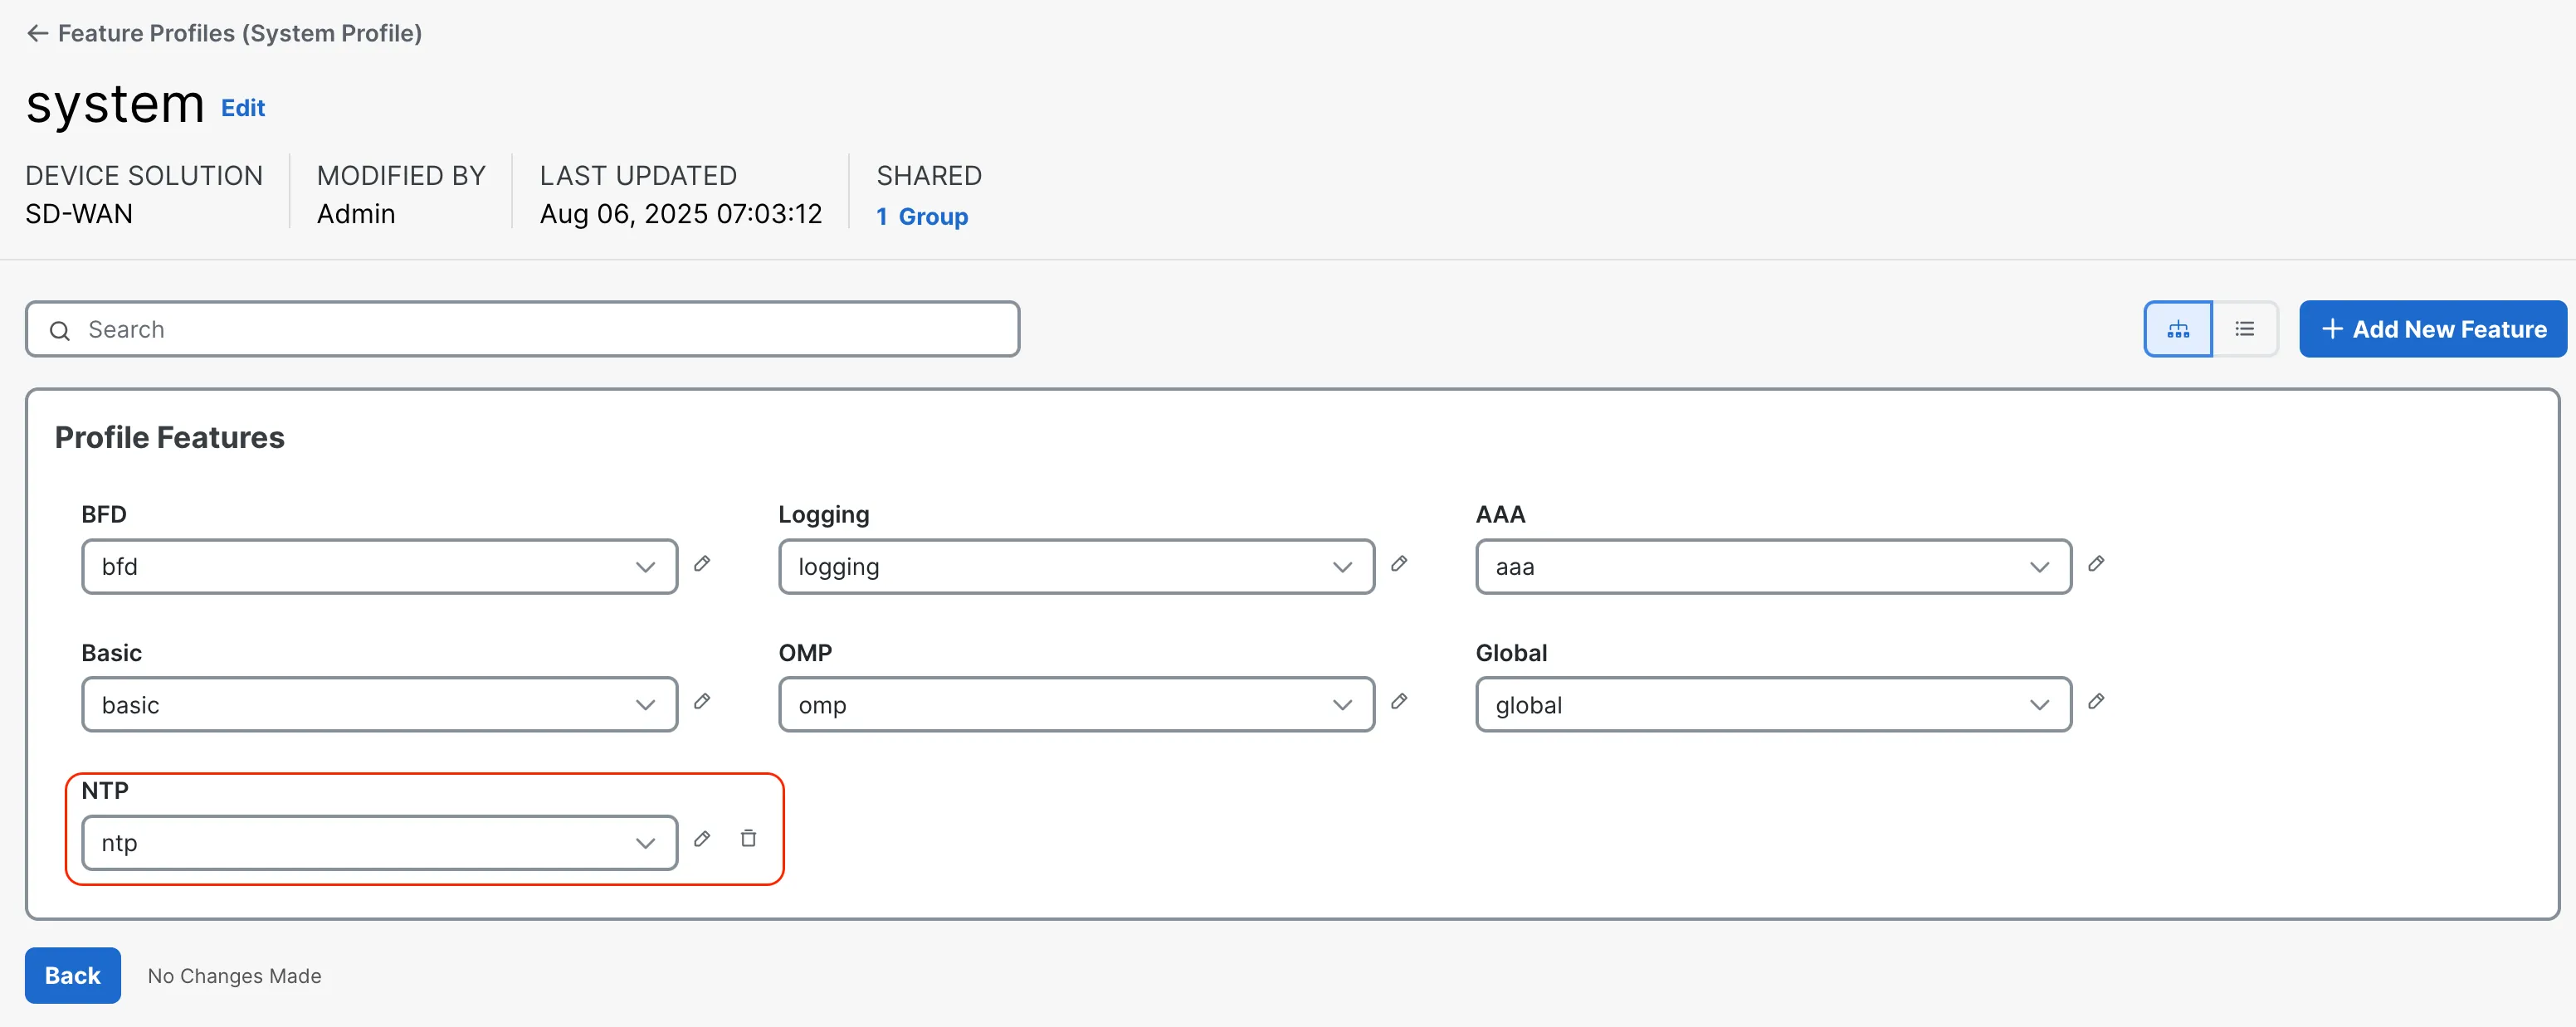
Navigate to Catalyst SD-WAN Manager and make sure that the ntp feature was added to the system feature profile.
Step 4: Removing resources
Section titled “Step 4: Removing resources”In this step you will remove ntp feature, which was created in step 3.
Remove the ntp section from configuration.nac.yaml
ntp: name: ntp servers: - hostname_ip: ntp.example.comThe configuration.nac.yaml file should once again look like this:
---sdwan: configuration_groups: - name: branches system_profile: system transport_profile: transport feature_profiles: system_profiles: - name: system aaa: name: aaa users: - name: admin password: YudmqT6MWZyak3M basic: name: basic bfd: name: bfd logging: name: logging global: name: global omp: name: omp transport_profiles: - name: transport wan_vpn: name: wan_vpn ethernet_interfaces: - name: inet interface_name_variable: inet_interface_name ipv4_configuration_type: dynamic shutdown: false tunnel_interface: color: biz-internet - name: mpls interface_name_variable: mpls_interface_name ipv4_configuration_type: dynamic shutdown: false tunnel_interface: color: mplsSave the file and run terraform apply:
terraform applyTerraform will compare the state file with the new plan and calculate any resources that need to be added, changed or destroyed. In this case 1 resource will be destroyed (removing NTP feature) and one will be changed (triggering repush of configuration group to a device).
Output:
Plan: 0 to add, 1 to change, 1 to destroy.Followed by yes to approve.
Navigate to SD-WAN and make sure that the NTP feature was removed from system feature profile.
Step 5: Making changes
Section titled “Step 5: Making changes”You have now added and removed resources, but what if you want to change additional configuration settings? For example; how would you change the BFD multiplier for your overlay? Which attributes can you use, and which values are expected? This is where the Data Model Docs come in. This section contains a list of all the resources that are currently supported. Under each resource you can find a list of attributes, their type, any constraints, whether they are required and whether they have a default value. It also contains a short and comprehensive example of that resource.
If you navigate to Data Models > Catalyst SD-WAN > Features - System > System BFD Feature, you can see that for multiplier the allowed values numbers from 1 to 6. You can also configure this parameter as device-specific by specifying variable name in the multiplier_variable attribute (this is discussed in the next step)
Update the configuration.nac.yaml file by adding the line multipler: 5 under bfd feature.
multipler: 5The section for bfd feature should look like this:
bfd: name: bfd multiplier: 5Save the file and run terraform apply:
terraform applyTerraform will compare the existing state file with the new plan and calculate any resources that need to be added, changed or destroyed. In this case 2 resource will be changed: one updating the bfd feature with new configuration and one triggering the configuration group deployment. The resources will be updated in-place.
Output:
Terraform used the selected providers to generate the following execution plan. Resource actions areindicated with the following symbols:  ~ update in-place
Terraform will perform the following actions:
  # module.sdwan.sdwan_configuration_group.configuration_group["branches"] will be updated in-place  ~ resource "sdwan_configuration_group" "configuration_group" {      ~ feature_versions    = [            # (1 unchanged element hidden)            "0",          + (known after apply),            "0",            # (4 unchanged elements hidden)            "0",          - "0",        ]        id                  = "590b6d06-953b-47ee-bfcf-00f5fe62440b"        name                = "branches"        # (4 unchanged attributes hidden)    }
  # module.sdwan.sdwan_system_bfd_feature.system_bfd_feature["system-bfd"] will be updated in-place  ~ resource "sdwan_system_bfd_feature" "system_bfd_feature" {        id                 = "f1a0ed22-85cb-45d3-9711-ccfef5601e9b"      + multiplier         = 5        name               = "bfd"      ~ version            = 0 -> (known after apply)        # (1 unchanged attribute hidden)    }
Plan: 0 to add, 2 to change, 0 to destroy.
Followed by yes to approve.
This will update the existing BFD feature with the new multiplier value. Navigate to Catalyst SD-WAN Manager and make sure that the BFD feature was updated with the new multiplier configuration.

Step 6: Updating device-specific values
Section titled “Step 6: Updating device-specific values”In the previous step you’ve set BFD multiplier to a global value of 5. This means all devices assigned to this configuration group will have this value configured. What if you would like to use a different value for each device? You can use device-specific variables by appending parameter name multiplier with _variable and specifying variable name. Change the multiplier 5 to multiplier_variable: bfd_multiplier.
The section for bfd feature should look like this:
bfd: name: bfd multiplier_variable: bfd_multiplierSince we’ve added a device-specific value, we can now specify a value in the sites.nac.yaml. Add new variable at the end of the file. The updated sites.nac.yaml file should look like below
sdwan: sites: - id: 1 routers: - chassis_id: C8K-3D1A8960-6E76-532C-DA93-50626FC5797E configuration_group: branches configuration_group_deploy: true device_variables: host_name: edge1 system_ip: 10.0.0.1 site_id: 1 pseudo_commit_timer: 300 inet_interface_name: GigabitEthernet1 mpls_interface_name: GigabitEthernet2 bfd_multiplier: 3Save the file and run terraform apply:
terraform applyTerraform will compare the existing state file with the new plan and calculate any resources that need to be added, changed or destroyed. In this case variable will be added to bfd feature and new value for the variable will be added in the configuration group resource.
Output:
Terraform used the selected providers to generate the following execution plan. Resource actions areindicated with the following symbols:  ~ update in-place
Terraform will perform the following actions:
  # module.sdwan.sdwan_configuration_group.configuration_group["branches"] will be updated in-place  ~ resource "sdwan_configuration_group" "configuration_group" {      ~ devices             = [          ~ {                id        = "C8K-3D1A8960-6E76-532C-DA93-50626FC5797E"              ~ variables = [                  + {                      + name  = "bfd_multiplier"                      + value = "3"                    },                    # (6 unchanged elements hidden)                ]                # (1 unchanged attribute hidden)            },        ]      ~ feature_versions    = [            # (1 unchanged element hidden)            "0",          ~ "1" -> (known after apply),            "0",            # (5 unchanged elements hidden)        ]        id                  = "590b6d06-953b-47ee-bfcf-00f5fe62440b"        name                = "branches"        # (3 unchanged attributes hidden)    }
  # module.sdwan.sdwan_system_bfd_feature.system_bfd_feature["system-bfd"] will be updated in-place  ~ resource "sdwan_system_bfd_feature" "system_bfd_feature" {        id                  = "f1a0ed22-85cb-45d3-9711-ccfef5601e9b"      - multiplier          = 5 -> null      + multiplier_variable = "{{bfd_multiplier}}"        name                = "bfd"      ~ version             = 1 -> (known after apply)        # (1 unchanged attribute hidden)    }
Plan: 0 to add, 2 to change, 0 to destroy.
Followed by yes to approve.
This will update the existing BFD feature with the new multiplier variable name and configuration group with value for a newly created variable. If you would like to update the value, you can go back to sites.nac.yaml and modify the device_variables section.
Step 7: Working with default values
Section titled “Step 7: Working with default values”The previous step explained how to change a setting on a single resource. If you have specific configuration you wish to apply to each instance of that resource you can leverage a defaults.nac.yaml file. The main.tf plan passes the content of defaults.nac.yaml to the module. This allows a user to modify any default settings to reflect their requirements. By default, the IPv6 is not configured on WAN VPN ethernet interfaces. In this example you will modify defaults to enable IPv6 on all WAN VPN interfaces that are created. Navigate to defaults.nac.yaml and explore the file:
# Overwrite default values here
# defaults:#   sdwan:#     feature_profiles:#       transport_profiles:#         wan_vpn:#           ethernet_interfaces:#             ipv6_configuration_type: dynamic
The defaults.nac.yaml file follows the same structure as the other yaml files in the inventory. Uncomment the lines and run terraform apply. The output will show that the terraform apply action will update the WAN VPN ethernet interfaces with its new configuration setting.
Terraform used the selected providers to generate the following execution plan. Resource actions areindicated with the following symbols:  ~ update in-place
Terraform will perform the following actions:
  # module.sdwan.sdwan_configuration_group.configuration_group["branches"] will be updated in-place  ~ resource "sdwan_configuration_group" "configuration_group" {      ~ feature_versions    = [            # (6 unchanged elements hidden)            "0",          - "0",          - "0",          + (known after apply),          + (known after apply),        ]        id                  = "590b6d06-953b-47ee-bfcf-00f5fe62440b"        name                = "branches"        # (4 unchanged attributes hidden)    }
  # module.sdwan.sdwan_transport_wan_vpn_interface_ethernet_feature.transport_wan_vpn_interface_ethernet_feature["transport-wan_vpn-inet"] will be updated in-place  ~ resource "sdwan_transport_wan_vpn_interface_ethernet_feature" "transport_wan_vpn_interface_ethernet_feature" {      + enable_dhcpv6                   = true        id                              = "76c87db3-2c51-4adf-989f-bc333f02ca22"      ~ ipv6_configuration_type         = "none" -> "dynamic"        name                            = "inet"      ~ version                         = 0 -> (known after apply)        # (9 unchanged attributes hidden)    }
  # module.sdwan.sdwan_transport_wan_vpn_interface_ethernet_feature.transport_wan_vpn_interface_ethernet_feature["transport-wan_vpn-mpls"] will be updated in-place  ~ resource "sdwan_transport_wan_vpn_interface_ethernet_feature" "transport_wan_vpn_interface_ethernet_feature" {      + enable_dhcpv6                   = true        id                              = "7e6cb43c-7821-4ba8-afc3-8226302ef754"      ~ ipv6_configuration_type         = "none" -> "dynamic"        name                            = "mpls"      ~ version                         = 0 -> (known after apply)        # (9 unchanged attributes hidden)    }
Plan: 0 to add, 3 to change, 0 to destroy.
Step 8: Changing configuration in the GUI
Section titled “Step 8: Changing configuration in the GUI”Imagine that someone unaware of the automation efforts makes a change directly in the GUI to one of the objects created by Terraform.
Delete the mpls feature from transport feature profile via GUI:
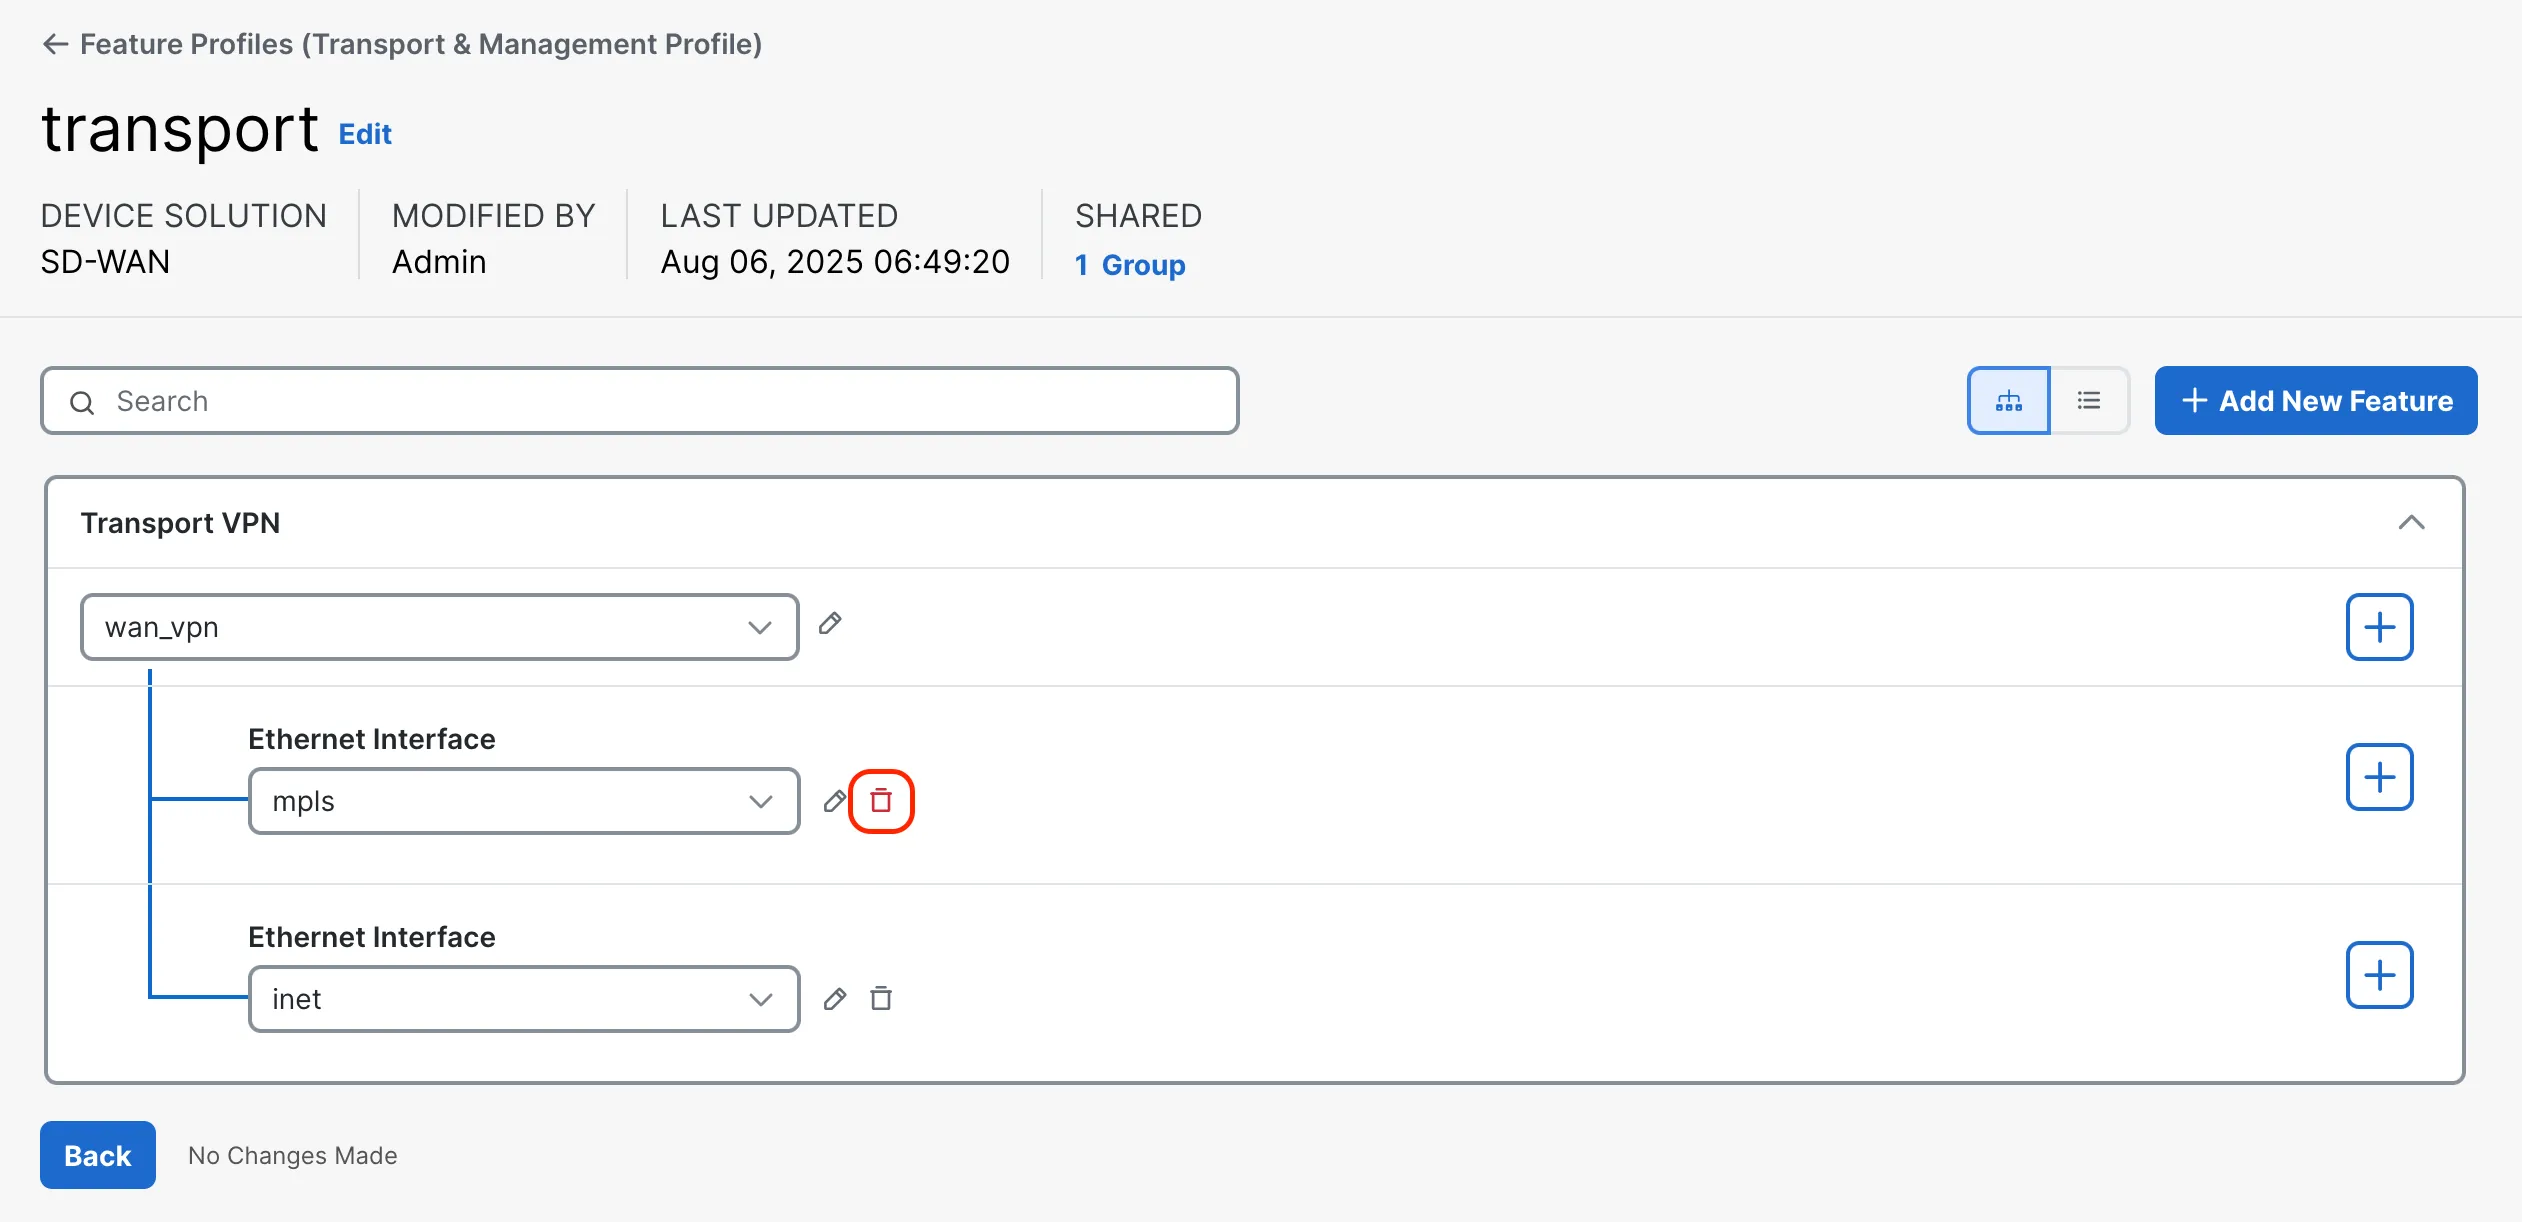
Because the Terraform state now differs from the running configuration a simple terraform apply will prompt you to recreate the mpls feature. Terraform is able to detect configuration drift and reconcile it.
</snip>Plan: 1 to add, 1 to change, 0 to destroy.
Do you want to perform these actions?  Terraform will perform the actions described above.  Only 'yes' will be accepted to approve.
This even works when changing properties of an object. The resource will be modified back to its desired state when terraform apply is executed. Feel free to make modifications via the GUI and restore those manual actions.
Step 9: Cleaning up
Section titled “Step 9: Cleaning up”That is it for this simple example. Feel free to experiment with additional resources. The final step is to clean up the configuration.
Run terraform destroy to remove the configuration:
terraform destroyOutput:
Plan: 0 to add, 0 to change, 32 to destroy.Followed by yes to approve.
Navigate to SD-WAN Manager and make sure that configuration group branches and the associated feature profiles have been removed.