Task1 - Concept and Tools
Throughout this lab you will encounter a number of concepts and tools that work together to form the “as code” workflow. We recommend spending about 10 minutes reading through this section before proceeding with the lab — it will give you a solid foundation for the hands-on tasks ahead.
YAML (YAML Ain’t Markup Language) is a human-readable data serialization format that uses indentation and simple key-value pairs to represent structured data. In this lab, YAML serves as the primary language for defining your desired network configuration — the data model. Rather than clicking through a dashboard or writing complex scripts, you describe what your network should look like in plain YAML files. These files are easy to read, review, and version-control alongside your code. YAML supports nested structures, lists, and references, making it well suited for expressing hierarchical network configurations such as organizations, networks, VLANs, and SSIDs. Because YAML is declarative, you focus on stating the intended end state rather than the sequence of steps required to reach it.
For example, the following YAML snippet defines an organization with a network and its configuration:
meraki: domains: - name: EU administrator: name: admin organizations: - name: Meraki Learning Lab managed: true networks: - name: branch-1 product_types: - appliance - switch - wireless - camera - sensor - cellularGateway time_zone: Europe/Berlin notes: Example data.yaml file tags: - admin - dev - emeaAn Integrated Development Environment (IDE) is a software application that provides a comprehensive workspace for writing, editing, and managing code and configuration files. In this lab, we recommend Visual Studio Code (VS Code) as the primary IDE. VS Code offers syntax highlighting for YAML, HCL, and Python, which helps you catch formatting errors early. It also provides integrated terminal access so you can run Terraform commands, Git operations, and Python scripts without leaving the editor. Extensions such as the HashiCorp Terraform extension add auto-completion and inline documentation for Terraform resources. Whether you use a locally installed copy or the browser-based Code Server provided in the lab environment, VS Code gives you a single pane of glass to manage every aspect of the as-code workflow. Other popular IDEs that work well with this workflow include JetBrains IntelliJ IDEA, PyCharm, and Sublime Text — each offering plugins for YAML validation and Terraform support. That said, since the data model is written entirely in YAML, even a simple text editor such as Vim, Nano, or Notepad is sufficient to make configuration changes. An IDE simply makes the experience more productive by providing syntax checking, auto-indentation, and integrated tooling.
Terraform / OpenTofu
Section titled “Terraform / OpenTofu”Terraform and OpenTofu serve as the automation engine for Meraki as Code — they are the tools that read your declared configuration and translate it into real network state. Terraform is an Infrastructure as Code tool developed by HashiCorp that lets you define, provision, and manage infrastructure using declarative configuration files written in HashiCorp Configuration Language (HCL). Instead of manually configuring network resources through a GUI, you describe your desired state in code and let the automation engine determine the actions required to achieve it. Terraform maintains a state file that tracks the current state of your managed resources, enabling it to calculate precise create, update, or delete operations on each run. Its plan-and-apply workflow allows you to preview changes before they are executed, reducing the risk of unintended modifications. OpenTofu is an open-source alternative to Terraform, maintained by the Linux Foundation. It is fully compatible with Terraform’s configuration language, providers, and modules, and can serve as a drop-in replacement. Organizations may choose between the two based on licensing preferences — Terraform uses the Business Source License (BSL), while OpenTofu is distributed under the MPL 2.0 open-source license. Both tools are fully supported in the Network as Code workflow. Throughout this lab, we use Terraform in all examples and commands, but the same steps apply if you choose to use OpenTofu instead.
Terraform Provider
Section titled “Terraform Provider”A Terraform Provider is a plugin that enables Terraform (or OpenTofu) to interact with a specific platform or service through its API. Each provider translates resource definitions into the appropriate API calls for its target platform. Providers are compatible with both Terraform and OpenTofu, so the same provider works regardless of which tool you choose. In this lab, we use the Cisco Meraki Terraform Provider (Terraform Registry | OpenTofu Registry), which communicates with the Meraki Dashboard REST API. The provider exposes resources and data sources for managing organizations, networks, devices, SSIDs, VLANs, and other dashboard settings. When you run terraform apply (or tofu apply), the provider reads your declared configuration, compares it with the current state, and makes the necessary API requests to bring the real environment in line with your intent. Providers are versioned independently and are downloaded automatically when you initialize a project.
For example, a provider resource to create a Meraki organization looks like this:
resource "meraki_organization" "example" { name = "Sample Organization" management_details = [ { name = "MSP ID" value = "123456" } ]}Terraform Module
Section titled “Terraform Module”A Terraform Module is a reusable, self-contained package of configuration that groups multiple resources into a single logical unit. Modules accept input variables, encapsulate internal logic, and expose outputs, allowing you to abstract complex infrastructure patterns behind a simple interface. Because modules are written in HCL, they are fully compatible with both Terraform and OpenTofu. In this lab, we use the Network-as-Code Cisco Meraki Module (Terraform Module | OpenTofu Registry), which reads your YAML data model and translates it into the appropriate resource definitions. This means you do not need to write individual HCL resource blocks for every network object — the module handles that transformation for you. By separating the data (YAML) from the logic (module), the workflow becomes cleaner and more maintainable. Modules can be versioned and shared, promoting consistency across teams and projects.
For example, the following module block consumes a YAML file and applies the configuration:
module "meraki" { source = "netascode/nac-meraki/meraki" yaml_files = ["organizations_admins.yaml"]}Where organizations_admins.yaml is defined as:
meraki: domains: - name: EU administrator: name: admin organizations: - name: Meraki Learning Lab managed: true admins: - name: lab_user email: labuser@example.com organization_access: full login_security: enforce_password_expiration: false password_expiration_days: 30 enforce_different_passwords: true num_different_passwords: 3Pre-change Validation (nac-validate)
Section titled “Pre-change Validation (nac-validate)”Pre-change validation allows the Data Model YAML to be validated first before proceeding further in the Network as Code workflow.
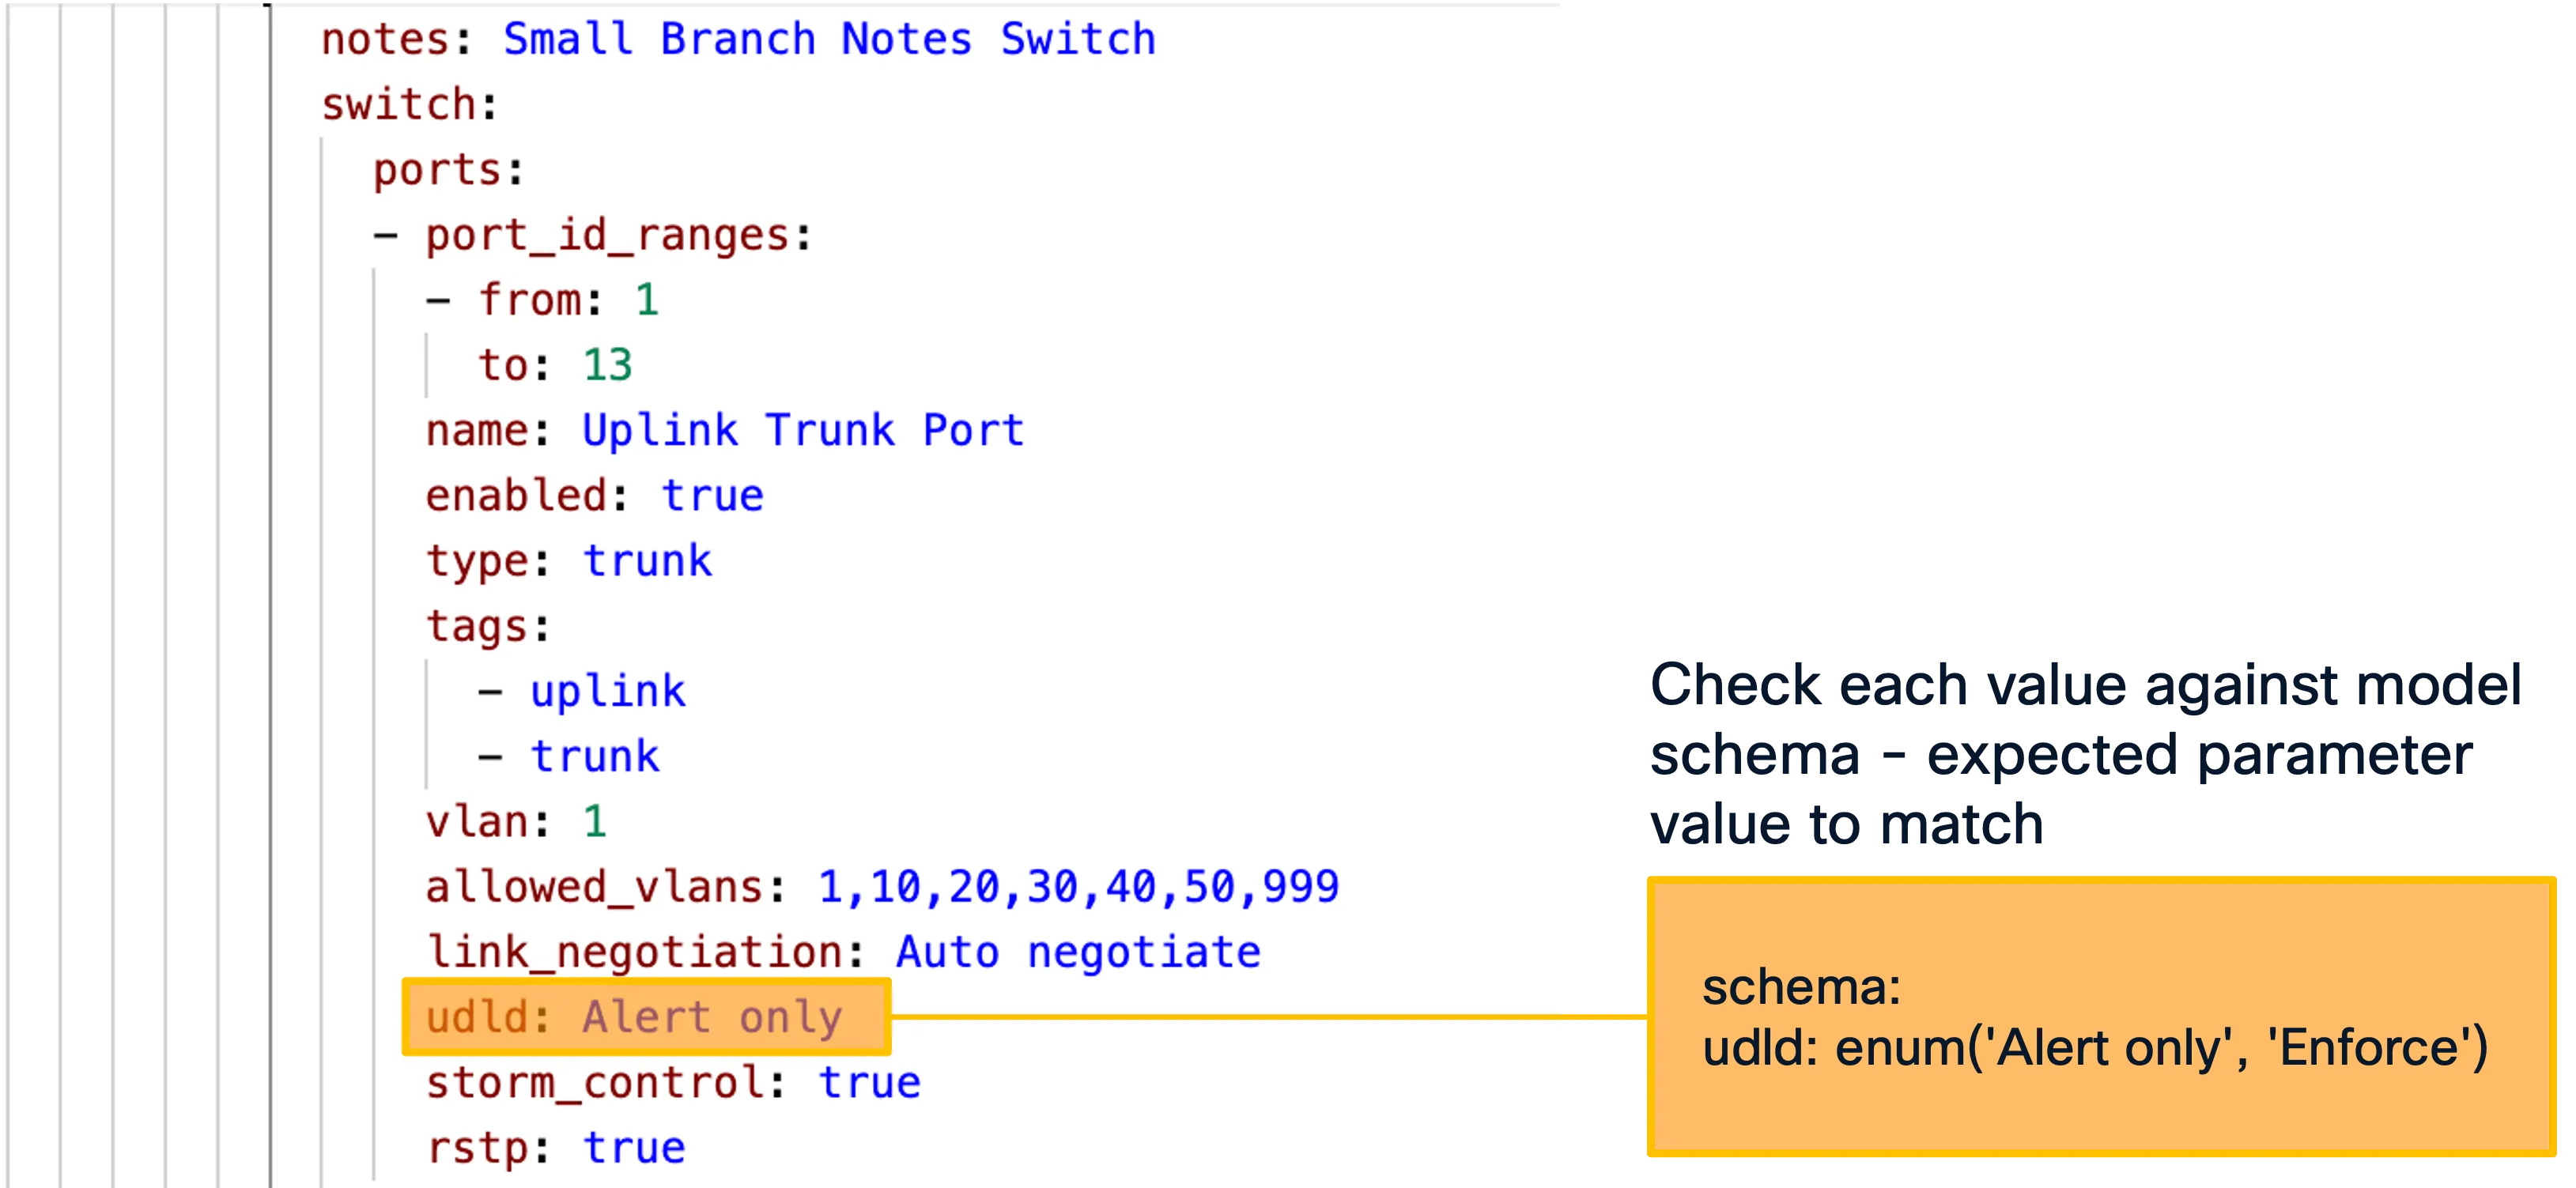
nac-validate is a CLI tool that performs syntactic and semantic validation of YAML files, checking your data model against a predefined schema before any deployment takes place. It acts as a pre-flight check, catching structural errors, missing required fields, incorrect data types, and invalid values early in the workflow — well before Terraform attempts to make API calls. By shifting validation left in the pipeline, nac-validate reduces the feedback loop and prevents failed deployments caused by malformed input. The tool compares each YAML file against the schema defined for the corresponding Terraform module, ensuring that your declared configuration conforms to the expected structure. Running nac-validate is an optional but strongly recommended step, especially in CI/CD pipelines where automated quality gates protect against configuration drift.
Syntactic validation is done by basic YAML syntax validation (e.g., indentation) and by providing a Yamale schema and validating all YAML files against that schema. Semantic validation is done by providing a set of rules (implemented in Python) which are then validated against the YAML data. Every rule is implemented as a Python class and should be placed in a .py file located in the —rules path.
The best way to “correlate” this to a software development process is to think of it as a linter. It checks the syntax and structure of the data model. To accomplish this, it uses a YAML schema to corroborate that data model. When working with code linting is a common practice to ensure that the code is syntactically correct and follows best practices. For Network as Code this facility allows the operators to validate their work while they are making changes to the data model.
In addition to the syntactic validation, nac-validate also can run rules to perform semantic and compliance checks.

$nac-validate --help
 Usage: nac-validate [OPTIONS] PATHS...
 A CLI tool to perform syntactic and semantic validation of YAML files.
╭─ Arguments ──────────────────────────────────────────────────────────────────────────────────────────────────────────────────────────────────────────────────────────────────────────────────────────╮│ *    paths      PATHS...  List of paths pointing to YAML files or directories. [required]                                                                                                            │╰──────────────────────────────────────────────────────────────────────────────────────────────────────────────────────────────────────────────────────────────────────────────────────────────────────╯╭─ Options ────────────────────────────────────────────────────────────────────────────────────────────────────────────────────────────────────────────────────────────────────────────────────────────╮│ --verbosity   -v      [DEBUG|INFO|WARNING|ERROR|CRITICAL]  Verbosity level. [env var: NAC_VALIDATE_VERBOSITY] [default: WARNING]                                                                     ││ --schema      -s      FILE                                 Path to schema file. [env var: NAC_VALIDATE_SCHEMA] [default: .schema.yaml]                                                               ││ --rules       -r      DIRECTORY                            Path to directory with semantic validation rules. [env var: NAC_VALIDATE_RULES] [default: .rules]                                         ││ --output      -o      FILE                                 Write merged content from YAML files to a new YAML file. [env var: NAC_VALIDATE_OUTPUT]                                                   ││ --non-strict                                               Accept unexpected elements in YAML files. [env var: NAC_VALIDATE_NON_STRICT]                                                              ││ --version                                                  Display version number.                                                                                                                   ││ --help                                                     Show this message and exit.                                                                                                               │╰──────────────────────────────────────────────────────────────────────────────────────────────────────────────────────────────────────────────────────────────────────────────────────────────────────╯
Schema
Section titled “Schema”To be able to do the syntactic validation in nac-validate, there is a schema file that defines the structure of the data model. The complete schema file is available as part of Services as Code.
The schema file is built utilizing Yamale, a YAML schema validator. Yamale is a Python library that allows Network as Code to perform this validation. Our tool, nac-validate, uses this library to validate the data in the model after some pre-processing steps.
To help you understand the schema file, the example repository of this lab contains a minimal schema that is provided for demonstration purposes. This schema file is located in the schema directory of the example repository.
Note : Due to the limited scope of the example schema file, you will not be able to perform syntax check of full configuration file. In normal operation, once the full schema file is available, you can do syntax check of any field in the configuration.
Validation Rules
Section titled “Validation Rules”To be able to do the semantic validation in nac-validate, there are validation rules that defines the semantic requirements. The complete validation rules are available as part of Services as Code.
The validation rules are implemented as a Python class and should be placed in a .py file.
To help you understand the Validation rule, the example repository of this lab contains a minimal rule that is provided for demonstration purposes. This rule files are located in the example repository.
Note : Due to the limited scope of the example rule file, you will only be able to perform limited semantic checks.
Post-Deployment Testing (nac-test)
Section titled “Post-Deployment Testing (nac-test)”nac-test is a Python-based testing tool that validates the actual state of your network devices after a deployment by comparing it against the desired state defined in your YAML data model. While nac-validate checks your input before deployment, nac-test checks the outcome after deployment — confirming that what was intended is what was actually applied. It queries the Meraki Dashboard API to retrieve the live configuration and then asserts that it matches the declared intent. This post-deployment verification is a critical part of the as-code workflow, providing confidence that changes were applied correctly and completely. nac-test integrates naturally into CI/CD pipelines as a final quality gate, ensuring that every change is verified automatically.
A CLI tool to render and execute Robot Framework tests using Jinja templating. Combining Robot’s language agnostic syntax with the flexibility of Jinja templating allows dynamically rendering a set of test suites from the desired infrastructure state expressed in YAML syntax.
In context of Services as Code, nac-test performs configuration testing of every configuration intent defined in the Data Model YAML. The tests are automatically executed based on the Input Data Model.
$ nac-test --help
 Usage: nac-test [OPTIONS]
 A CLI tool to render and execute Robot Framework tests using Jinja templating.
 Additional Robot Framework options can be passed at the end of the command to further control test execution (e.g., --variable, --listener, --loglevel). These are appended to the pabot invocation. Pabot-specific options and test files/directories are not supported and will result in an error.
╭─ Options ────────────────────────────────────────────────────────────────────────────────────────────────────────────────────────────────────────────────────────────────────────────────────────────╮│ *  --data         -d      PATH                                 Path to data YAML files. [env var: NAC_TEST_DATA] [required]                                                                          ││ *  --templates    -t      DIRECTORY                            Path to test templates. [env var: NAC_TEST_TEMPLATES] [required]                                                                      ││ *  --output       -o      DIRECTORY                            Path to output directory. [env var: NAC_TEST_OUTPUT] [required]                                                                       ││    --filters      -f      DIRECTORY                            Path to Jinja filters. [env var: NAC_TEST_FILTERS]                                                                                    ││    --tests                DIRECTORY                            Path to Jinja tests. [env var: NAC_TEST_TESTS]                                                                                        ││    --include      -i      TEXT                                 Selects the test cases by tag (include). [env var: NAC_TEST_INCLUDE]                                                                  ││    --exclude      -e      TEXT                                 Selects the test cases by tag (exclude). [env var: NAC_TEST_EXCLUDE]                                                                  ││    --render-only                                               Only render tests without executing them. [env var: NAC_TEST_RENDER_ONLY]                                                             ││    --dry-run                                                   Dry run flag. See robot dry run mode. [env var: NAC_TEST_DRY_RUN]                                                                     ││    --processes            INTEGER                              Number of parallel processes for test execution (pabot --processes option), default is max(2, cpu count).                             ││                                                                [env var: NAC_TEST_PROCESSES]                                                                                                         ││    --verbosity    -v      [DEBUG|INFO|WARNING|ERROR|CRITICAL]  Verbosity level. [env var: NAC_VALIDATE_VERBOSITY] [default: WARNING]                                                                 ││    --version                                                   Display version number.                                                                                                               ││    --help                                                      Show this message and exit.                                                                                                           │╰──────────────────────────────────────────────────────────────────────────────────────────────────────────────────────────────────────────────────────────────────────────────────────────────────────╯
Python Virtual Environment
Section titled “Python Virtual Environment”A Python virtual environment is an isolated runtime environment with its own interpreter and packages, separate from your system-wide Python installation. In this lab, tools such as nac-validate and nac-test are Python packages with their own dependencies — installing them system-wide can lead to version conflicts with other projects on your machine. A virtual environment keeps each project’s dependencies separate and consistent. Tools like pyenv make it easy to manage multiple Python versions and virtual environments on the same system, and you activate the environment before installing or running the validation and testing tools. This practice keeps your development setup clean, reproducible, and portable across different machines and CI/CD runners.
Sample Git Repository
Section titled “Sample Git Repository”The Sample Git Repository for Meraki as Code provides a ready-to-use project structure for managing Meraki infrastructure as code. It serves as both a quickstart template and the foundation for this learning lab. Cloning this repository gives you a working Terraform configuration, a YAML data model directory, pre-built lab exercises, validation rules, and CI/CD pipeline definitions — everything you need to begin defining and deploying Meraki networks declaratively. The folder structure below outlines how the repository is organized:
nac-meraki-example/├── .ci/ # CI/CD helper scripts (GitLab comments, Webex notifications)├── data/ # Your YAML data model files go here (empty by default)├── lab-data/ # Pre-built YAML files for each lab exercise step│ ├── 01_create_org.nac.yaml│ ├── 02_configure_network.nac.yaml│ ├── 03_add_wireless.nac.yaml│ ├── 04_switch_settings.nac.yaml│ ├── 05_add_firewall_sdwan_settings.nac.yaml│ ├── 06_scale_network.nac.yaml│ ├── 08_branch_variables.nac.yaml│ └── 08_templates.nac.yaml├── rules/ # Custom nac-validate Python rules├── workspaces/ # Separate Terraform workspace for template rendering├── .gitlab-ci.yml # GitLab CI/CD pipeline definition├── main.tf # Root Terraform configuration (references the NaC Meraki module)└── schema.yaml # YAML schema for data model validationdata/— The primary directory where you place your YAML data model files. The rootmain.tfpoints Terraform to this folder viayaml_directories = ["data"]. It starts empty; you populate it as you progress through the lab.lab-data/— Contains pre-built YAML files corresponding to each lab exercise. You can copy these intodata/step-by-step to follow along, or use them as reference to verify your own configurations.rules/— Houses custom Python validation rules used by nac-validate for semantic checks beyond schema validation (e.g., enforcing naming conventions).workspaces/— Contains a separatemain.tffor the template rendering module, which merges YAML templates and configuration files into a single output..ci/— CI/CD helper scripts for GitLab pipelines, including automated comments on merge requests and Webex notifications.main.tf— The root Terraform configuration that references the NaC Meraki module from GitHub and reads your YAML data model from thedata/directory.schema.yaml— Defines the YAML schema used by nac-validate for syntactic validation of your data model files.
Templates
Section titled “Templates”One of the powerful capabilities of the Network as Code approach is templating. Instead of duplicating YAML configurations for every network or branch, you can define reusable templates that capture common settings — such as SSID profiles, VLAN configurations, or firewall rules — and apply them across your data model through variable mapping. Each instance of a template only needs to specify the values that differ, such as site-specific IP addresses, device serial numbers, or network names. This drastically reduces repetition, minimizes the risk of configuration drift between sites, and makes large-scale changes as simple as updating a single template. Templating turns your data model into a scalable, maintainable blueprint where shared intent is defined once and variations are expressed as lightweight overrides.
The Template Rendering Module enables rendering of templates into Data Model YAML that feeds Terraform, nac-validate, and nac-test. At this time, Network level Templates are supported.
This is useful when defining templates for specific features or configurations that need to be applied across multiple resources. For example, you may want to create multiple identical branches where only a subset of parameters—such as IP addressing or device serial numbers—differs from branch to branch.
module "model" {  source  = "netascode/nac-meraki/meraki//modules/model"
  yaml_directories = ["data/"]  write_model_file = "model.yaml"}
In this sample above, the module will merge all network templates (*.yaml files) under the data/ folder and create a merged model.yaml file.