Task 3 - Working with Meraki Data Model
In this section, we will:
- Build an example data model using Meraki as Code
- Define the configuration of a Meraki network for the Meraki Dashboard
- Use a simplified configuration to keep the lab lightweight and free of hardware requirements
Step 1: Understanding the Data Model
Section titled “Step 1: Understanding the Data Model”The data model is a structured YAML document that describes your intended network configuration. Terraform — the automation engine behind Meraki as Code — reads this YAML, extracts the parameters, and maps them to the appropriate Meraki provider resources and modules for deployment. Because the entire workflow depends on the accuracy of this data model, it is important to validate it first using tools like nac-validate, ensuring Terraform receives complete and correct input before any changes are applied.
Example: YAML → Terraform Resource
Data Model (YAML):
.. organizations: - name: Meraki Learning Org networks: - name: Branch 1 syslog_servers: - host: 1.2.3.4 port: 514 roles: - Switch event log - Air Marshal events - Flows - URLs - Wireless event log - Appliance event logTerraform Interpretation:
# module.meraki.meraki_network_syslog_servers.networks_syslog_servers["Meraki Learning Org/Branch 1"] will be created + resource "meraki_network_syslog_servers" "networks_syslog_servers" { + id = (known after apply) + network_id = (known after apply) + servers = [ + { + host = "1.2.3.4" + port = 514 + roles = [ + "Air Marshal events", + "Appliance event log", + "Flows", + "Switch event log", + "URLs", + "Wireless event log", ] }, ] }When using Infrastructure as Code, the data model represents the declaration of intent. The operator describes what the network should look like — not how to configure it. Terraform and Netascode modules translate this intent into the actual Meraki configuration. In IaC practices, the data model serves as the source of truth.
Step 2: Schema and Validation
Section titled “Step 2: Schema and Validation”Each field in the data model must follow the constraints defined in the Meraki schema:
- Type (string, number, enum…)
- Allowed values
- Value range
- Mandatory / optional
- Default values
Meraki as code schema define the structure and constraints for the data model. The complete requirements are documented in the Network as Code Meraki Data Model Overview. Take a moment to review the documentation and familiarize yourself with the schema, as it will help you understand how to structure your data model correctly.
Example: Syslog Port
.. organizations: - name: Meraki Learning Org networks: - name: Branch 1 syslog_servers: - host: 1.2.3.4 port: 514| Name | Type | Constraint | Mandatory | Default Value |
|---|---|---|---|---|
| port | Integer | Integer 0–65535 | Yes | — |
If the port value is missing in the above referenced syslog configuration, rendering will fail because it is mandatory.
Example: Admin Configuration
organizations_admin: email: admin@example.com name: Branch Admin| Name | Type | Constraint | Mandatory | Default |
|---|---|---|---|---|
| organizations_admin.email | String | Length 1–127 | No | — |
| organizations_admin.name | String | Length 1–127 | No | — |
Here, both fields are optional and simply need to follow length constraints if used. If both fields are missing, the configuration will still be valid and rendered successfully.
Step 3: Understanding the Templates (Advanced)
Section titled “Step 3: Understanding the Templates (Advanced)”You may come back to this section after completing the lab exercises with regular data model configuration. It is an optional section that describes the use of templates to build a modular data model, which is an advanced topic.
Meraki as Code also supports defining Data Model in a modular way through the use of templates. Templates allow you to abstract large portions of configuration logic into reusable building blocks. These are Network as Code templates, not Meraki configuration templates. The templates are written in YAML and can be parameterized to allow for customization based on the specific needs of each deployment.
Templates offer:
- Consistency across deployments
- Separation of logic and input
- Modularity (appliance, switching, wireless, WAN, etc.)
- Extensibility when customizing your environment
In the example repository, templates are intentionally minimized to avoid requiring hardware. Templates are stored in template-*.yaml files.
There are 2 types of templates:
- Model templates: These templates are part of the Data Model that allows for reusable configuration blocks. They are defined with
type: model. These templates contain variables that need to be provided in the variables file when applying the template to a specific network. They are used in this lab and will be covered in detail in the next steps. - File templates: These templates are used to generate configuration files that can be applied to the network. They are defined with
type: fileand they generate configuration files that can be applied to the network. They are not used in this lab but will be covered in future documentation.
Example: Network Management Template
In the below example, we can see that the nw_management template defines a reusable configuration block for network management settings, including syslog servers and SNMP users. The template is parameterized with variables such as ${local_page_username}, ${snmp_username}, ${syslog_server}, and ${syslog_port}. When this template is applied to a specific network, these variables will be replaced with actual values from the variables file. This allows for consistent configuration across multiple networks while still allowing for customization based on specific needs.
Template Definition:
meraki: templates: networks: - name: nw_management type: model configuration: settings: local_status_page_enabled: true remote_status_page: true secure_port: false local_status_page_authentication: username: ${local_page_username} password: !env secret_password named_vlans: true snmp: access: users users: - username: ${snmp_username} passphrase: !env secret_password syslog_servers: - host: ${syslog_server} port: ${syslog_port} roles: - Switch Event log - Air Marshal events - Flows - URLs - Wireless Event log - Appliance Event logApplying the template to a network:
You can see below that the nw_management template is applied to both Branch 1 and Branch 2 networks each with different variables provided for syslog server, SNMP username, and local page username. This allows for consistent configuration across both branches while still allowing for customization based on specific needs of each branch.
meraki: domains: - name: EU administrator: name: admin organizations: - name: Meraki Learning Org managed: true networks: - name: Branch 1 templates: [nw_management] variables: syslog_server: 1.1.1.1 syslog_port: 514 snmp_username: branch1_snmp_user local_page_username: branch1_local_user - name: Branch 2 templates: [nw_management] variables: syslog_server: 2.2.2.2 syslog_port: 514 snmp_username: branch2_snmp_user local_page_username: branch2_local_userIn this template we can notice some key concepts:
- Environment Variables for Secrets
Sensitive values (passwords, tokens, etc.) are provided via !env like !env secret_password. These come from the .env file configured earlier, which is excluded from version control. In production, secrets should rather be supplied via a CI/CD pipeline’s secret manager.
- Input Variables
The following values referred with a ${} must be provided in the variables file when applying the template to a specific network.
- snmp_username
- syslog_server
- syslog_port
- local_page_username
User shall be providing these value as input. We will check this out in the next step.
In summary, templates abstract the configuration - users specify only the parameters they need to change.
Deployments become consistent, repeatable, and low-risk as every time we apply template we ensure repeatability and consistency and eliminate any potential human configuration error.
Modifying Templates
Section titled “Modifying Templates”Templates are regular YAML files that you can adjust. Let’s consider that we want to perform following modififications:
- SNMP is not used → remove it (comment out or delete the snmp section)
- Syslog is always 1.2.3.4:514 → hardcode values (replace variables with actual values)
- Named VLANs not desired → disable it (Change true >> false)
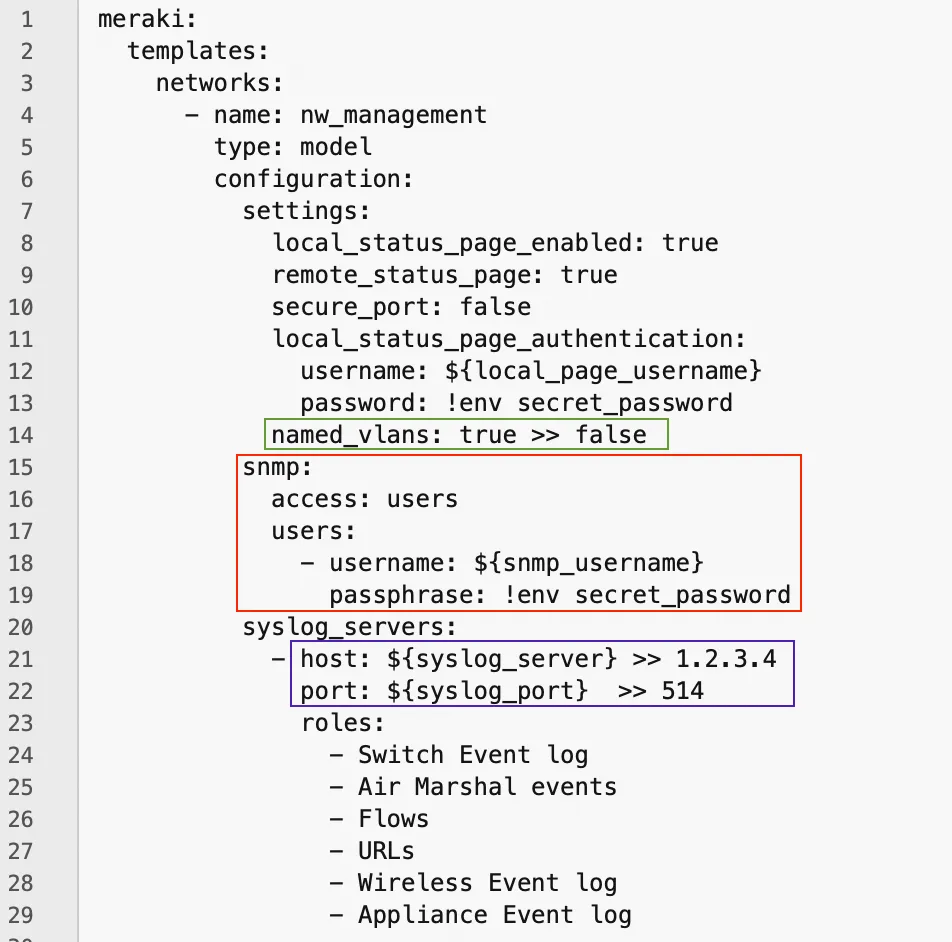
Then our configuration becomes:
meraki: templates: networks: - name: nw_management type: model configuration: settings: local_status_page_enabled: true remote_status_page: true secure_port: false local_status_page_authentication: username: ${local_page_username} password: !env secret_password named_vlans: false syslog_servers: - host: 1.2.3.4 port: 514 roles: - Switch Event log - Air Marshal events - Flows - URLs - Wireless Event log - Appliance Event logRendering the Templates
Section titled “Rendering the Templates”Rendering is the process that combines templates and variables (essentially everything in the data/ folder) into one merged YAML file.

The variable file also defines which templates apply to each network:
- name: Branch 1 templates: [ nw_setup, nw_management, switch, wireless, app_settings, app_vlans, app_fw, app_content, app_static_routes, group_policies, ]For example, if we do not want to configure wireless for a particular branch we can simply just remove associated wireless template.
Rendering is performed in the workspaces directory through the netascode model merge module: github.com/netascode/terraform-meraki-nac-meraki/modules/model
This module is configured in main.tf in workspace folder:
module "model" { source = "github.com/netascode/terraform-meraki-nac-meraki/modules/model" yaml_directories = ["../data"] write_model_file = "merged_configuration.nac.yaml"}This module will:
- Load templates and variables from
/datafolder - Deep-merge them
- Generate
merged_configuration.nac.yaml