Task 4 - Creating your first Organization
So far in this lab, we have:
- Meraki as Code Concept and Tools: We have learned about the Meraki as Code concept, its benefits, and the tools we will be using in this lab.
- Prepare your environment for Meraki as Code: We have cloned the example repository, set environment variables, and familiarized ourselves with the data model structure.
- Working with Meraki Data Model: We have explored the data model structure, understood how templates and variables are organized, and how to modify them to fit our needs.
Understanding the deployment process
Section titled “Understanding the deployment process”The first thing to remember is that this capability operates using Terraform as Automation (OpenTofu is an open-source alternative). We structure the deployment using Terraform modules, which act as reusable building blocks. These modules read the data model—your inputs, variables, and configuration parameters—and translate them into Terraform-managed resources. Once executed, Terraform compares the desired configuration against the current state of the infrastructure. By running terraform plan, the tool determines what changes are required (create, update, or delete). Then, with terraform apply, Terraform performs these changes in the correct order, ensuring that all dependencies are respected and the infrastructure matches the declared state. This allows us to deploy consistent, repeatable, and predictable configurations to Dashboard or any other supported platform.
Step 1: Verify environment variables
Section titled “Step 1: Verify environment variables”Before proceeding with the deployment, it is essential to verify that the environment variables are set correctly. You can do this by running the following command in the terminal:
We previously created and entered data in .env file. You may source this again if you have missed it.
source .envVerify:
echo $MERAKI_API_KEYecho $org_emailecho $secret_passwordYou now know why it is not recommended to keep environment variables with in a local Automation server. Since this is a lab organization, it is fine.
Step 2: Initialise Terraform
Section titled “Step 2: Initialise Terraform”The main.tf file in the root directory is the origin of your project — it defines which Terraform module to use and where to find your data model:
# terraform {#   backend "http" {#     skip_cert_verification = true#   }# }
module "meraki" {source           = "github.com/netascode/terraform-meraki-nac-meraki?ref=<tag>"yaml_directories = ["data"]}
Let us breakdown what is configured in the main.tf
module
A Terraform module is a reusable, self-contained package of configuration that encapsulates resources, variables, and logic into a single unit. Here, "meraki" is the local name we assign to the module instance.
source
This tells Terraform to use the open-source terraform-meraki-nac-meraki module from the NetAsCode GitHub organization.
yaml_directories
This tells Terraform to read all YAML files from the data/ directory as input.
backend
The backend "http" block (commented out above for now) configures Terraform to store its state file on a remote HTTP endpoint instead of locally. This is useful in CI/CD pipelines where multiple runs or team members need shared access to the same state. In this lab the backend is commented out so Terraform uses the default local state file, but in a production deployment you would enable it to point to a one of the several supported backends for tfstate,
Run init
Section titled “Run init”Before Terraform can execute a plan or apply changes, it must first initialize the working directory. The terraform init command downloads the modules and providers referenced in main.tf, sets up the backend for state storage, and prepares the environment for execution. This is a one-time step that needs to be repeated only when module or provider versions change.
terraform initExpected output:
meraki-as-code) dcloud@lin-wkst1:~/network-as-code/meraki-as-code$ terraform initInitializing the backend...Initializing modules...Downloading git::https://github.com/netascode/terraform-meraki-nac-meraki.git for meraki...- meraki in .terraform/modules/meraki- meraki.model in .terraform/modules/meraki/modules/modelInitializing provider plugins...- terraform.io/builtin/terraform is built in to Terraform- Finding ciscodevnet/meraki versions matching ">= 1.8.0"...- Finding netascode/utils versions matching ">= 0.2.6"...- Finding hashicorp/local versions matching ">= 2.5.2"...- Installing ciscodevnet/meraki v1.9.0...- Installed ciscodevnet/meraki v1.9.0 (signed by a HashiCorp partner, key ID 974C06066198C482)- Installing netascode/utils v1.0.2...- Installed netascode/utils v1.0.2 (self-signed, key ID 48630DA58CAFD6C0)- Installing hashicorp/local v2.7.0...- Installed hashicorp/local v2.7.0 (signed by HashiCorp)Partner and community providers are signed by their developers.If you'd like to know more about provider signing, you can read about it here:https://developer.hashicorp.com/terraform/cli/plugins/signingTerraform has created a lock file .terraform.lock.hcl to record the providerselections it made above. Include this file in your version control repositoryso that Terraform can guarantee to make the same selections by default whenyou run "terraform init" in the future.
Terraform has been successfully initialized!
You may now begin working with Terraform. Try running "terraform plan" to seeany changes that are required for your infrastructure. All Terraform commandsshould now work.
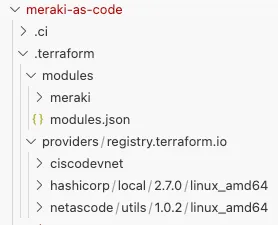
If you ever set or change modules or backend configuration for Terraform,rerun this command to reinitialize your working directory. If you forget, othercommands will detect it and remind you to do so if necessary.Once initialization completes, you will see a .terraform directory created in your project root. This folder contains the downloaded modules and provider plugins that Terraform needs to execute your configuration.
Further the terraform plan is to be performed. Before we do that we need to populate the Data Model in the yaml_directories referenced in main.tf
Step 3: Create your first Configuration
Section titled “Step 3: Create your first Configuration”In this step, you will define a new Organization using Meraki as Code — writing your first configuration intent in YAML and deploying it to the Meraki Dashboard.
Go to your Code Server
On the Explorer in the left you can see, the
datafolder is empty and some configurations are placed inlab-datafolder.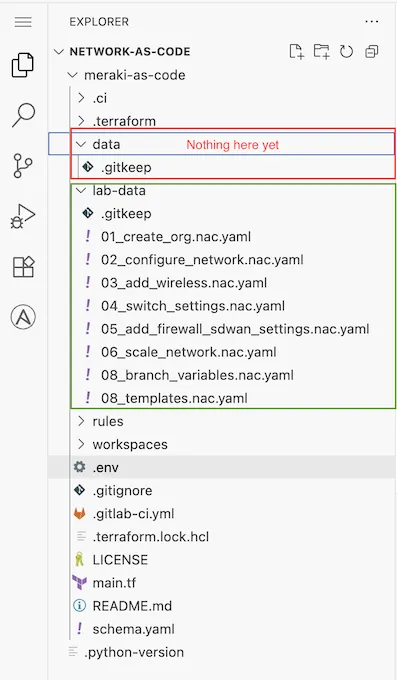
Copy the file
01_create_org.nac.yamlfromlab-datafolder to thedatafolder. If you can recall why we need to add configuration YAML todatafolder, because thats the folder we defined inmain.tfReview the contents of the file and see if you can understand the YAML syntax, environment variables etc.
meraki:domains:- name: EUadministrator:name: rootorganizations:- name: Meraki Learning Labmanaged: trueadmins:- name: Learning Lab useremail: !env org_emailorganization_access: fulllogin_security:enforce_password_expiration: falsepassword_expiration_days: 1095enforce_different_passwords: truenum_different_passwords: 3The Data Model Syntax for Organization settings can be referred at Organizations General Management
Summary: We have a org named
Meraki Learning Labdefined under domainEU. The organization has an admin configured in it, that is referred by theorg_emailenvironment variable and then an org levellogin_securityis defined.
Step 4: Pre-change Validation
Section titled “Step 4: Pre-change Validation”In this step you will perform a pre-change validation on your YAML using the nac-validate tool to confirm if the YAML is syntactically and semantically right.
- Run the following command to execute
nac-validateon your YAML.
cd /home/dcloud/network-as-code/meraki-as-code/nac-validate --non-strict -s schema.yaml -r rules/ data/01_create_org.nac.yamlThe nac-validate takes 3 mandatory arguments to run.
- Schema file.
-sflag followed by the schema file - Rules folder.
-rflag followed by the path to the validation rules - path to yaml file or directory
You will see output as below
ERROR - Syntax error 'data/01_create_org.nac.yaml': meraki.domains.[name=EU].organizations.[name=Meraki Learning Lab].login_security.password_expiration_days: 1095 is greater than 365- Understanding nac-validate syntax error
ERROR - Syntax error 'data/01_create_org.nac.yaml': meraki.domains.[name=EU].organizations.[name=Meraki Learning Lab]. login_security.password_expiration_days: 1095 is greater than 365- This means, our YAML has a syntax error on the path
meraki.domains.[name=EU].organizations.[name=Meraki Learning Lab].login_security.password_expiration_days. - The error says, the password expiration days you have mentioned is
1095. - But the schema accepts only a maximum of 365 days for this field.
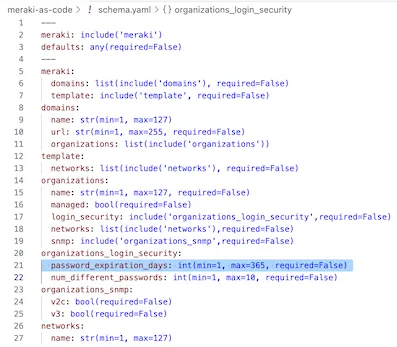
This syntax error is based on the schema file at schema.yaml in the root directory. Browse to the schema and below highlighted line to see how its enforced in schema.
- Fixing nac-validate syntax error
Get back to your YAML file 01_create_org.nac.yaml in data folder and modify the value for password_expiration_days from 1095 to something <= 365. Let us use 30
Existing YAML
meraki: domains: - name: EU administrator: name: root organizations: - name: Meraki Learning Lab managed: true admins: - name: Learning Lab user email: !env org_email organization_access: full login_security: enforce_password_expiration: false password_expiration_days: 1095 enforce_different_passwords: true num_different_passwords: 3Your YAML should look as below once modified.
meraki: domains: - name: EU administrator: name: root organizations: - name: Meraki Learning Lab managed: true admins: - name: Learning Lab user email: !env org_email organization_access: full login_security: enforce_password_expiration: false password_expiration_days: 30 << this was 1095 and you modified to 30 enforce_different_passwords: true num_different_passwords: 3- Run the
nac-validateagain for the same file.
cd /home/dcloud/network-as-code/meraki-as-code/nac-validate --non-strict -s schema.yaml -r rules/ data/01_create_org.nac.yamlYou should see output as below
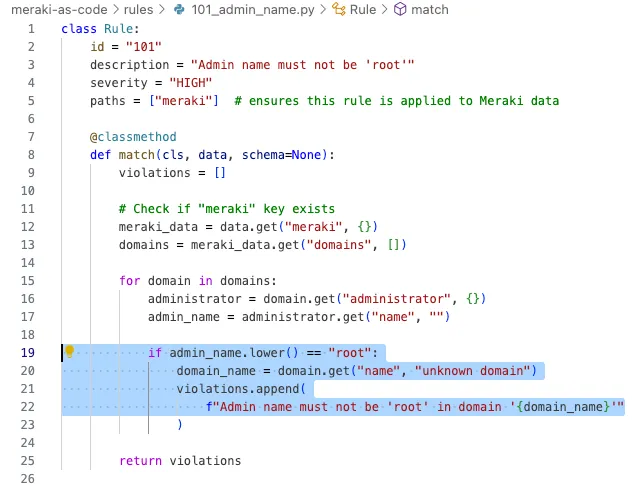
ERROR - Semantic error, rule 101: Admin name must not be 'root' (["Admin name must not be 'root' in domain 'EU'"])Good. We no more see syntax error. We can look at the semantic error in next section.
- Understanding nac-validate semantic error
ERROR - Semantic error, rule 101: Admin name must not be 'root' (["Admin name must not be 'root' in domain 'EU'"])- This means, our YAML has a semantic error.
- The error says, the
adminname cannot be set to valuerootunder domainEU
This sematic error is based on the validation rules at rules folder in the root directory. Browse to rules\101_admin_name.py and try to review how the enforcement for admin name is configured.
- Fixing nac-validate semantic error
Get back to your YAML file 01_create_org.nac.yaml in data folder and modify the value for meraki.domains.[name=EU].administrator.name to anything other than root. Let use admin
Existing YAML
meraki: domains: - name: EU administrator: name: root organizations: - name: Meraki Learning Lab managed: true admins: - name: Learning Lab user email: !env org_email organization_access: full login_security: enforce_password_expiration: false password_expiration_days: 30 enforce_different_passwords: true num_different_passwords: 3Your YAML should look as below once modified.
meraki: domains: - name: EU administrator: name: admin << this was root and you modified to admin organizations: - name: Meraki Learning Lab managed: true admins: - name: Learning Lab user email: !env org_email organization_access: full login_security: enforce_password_expiration: false password_expiration_days: 30 enforce_different_passwords: true num_different_passwords: 3- Run the
nac-validateagain for the same file.
cd /home/dcloud/network-as-code/meraki-as-code/nac-validate --non-strict -s schema.yaml -r rules/ data/01_create_org.nac.yamlYou should see output as below.
(meraki-as-code) dcloud@lin-wkst1:~/network-as-code/meraki-as-code$ nac-validate --non-strict -s schema.yaml -r rules/ data/01_create_org.nac.yaml(meraki-as-code) dcloud@lin-wkst1:~/network-as-code/meraki-as-code$Great. No more error. Our YAML is good.
Step 5: Plan your changes.
Section titled “Step 5: Plan your changes.”In this step, you will use terraform plan to help you list the changes that will be made based on your YAML input. This step helps the operator understand the impact of the changes he/she is about to perform.
Run the command
terraform planTerminal window terraform planReview the plan output and see what you can understand before reading the further sections.
(meraki-as-code) dcloud@lin-wkst1:~/network-as-code/meraki-as-code$ terraform planTerraform used the selected providers to generate the following execution plan. Resource actions are indicated with the following symbols:+ createTerraform will perform the following actions:# module.meraki.meraki_organization.organizations["EU/Meraki Learning Lab"] will be created+ resource "meraki_organization" "organizations" {+ id = (known after apply)+ name = "Meraki Learning Lab"}# module.meraki.meraki_organization_admin.organizations_admins["EU/Meraki Learning Lab/Learning Lab user"] will be created+ resource "meraki_organization_admin" "organizations_admins" {+ email = "demouser@example.com" << this value is populated from environment variable during runtime.+ id = (known after apply)+ name = "Learning Lab user"+ org_access = "full"+ organization_id = (known after apply)}# module.meraki.meraki_organization_login_security.organizations_login_security["EU/Meraki Learning Lab"] will be created+ resource "meraki_organization_login_security" "organizations_login_security" {+ enforce_different_passwords = true+ enforce_password_expiration = false+ id = (known after apply)+ num_different_passwords = 3+ organization_id = (known after apply)+ password_expiration_days = 30}# module.meraki.module.model.terraform_data.validation will be created+ resource "terraform_data" "validation" {+ id = (known after apply)}Plan: 4 to add, 0 to change, 0 to destroy.──────────────────────────────────────────────────────────────────────────────────────────────────────────────────────────────────────────────────────────────────────────────────────────────────────Note: You didn't use the -out option to save this plan, so Terraform can't guarantee to take exactly these actions if you run "terraform apply" now.Hope you were able to understand the plan output. The plan is explained below.
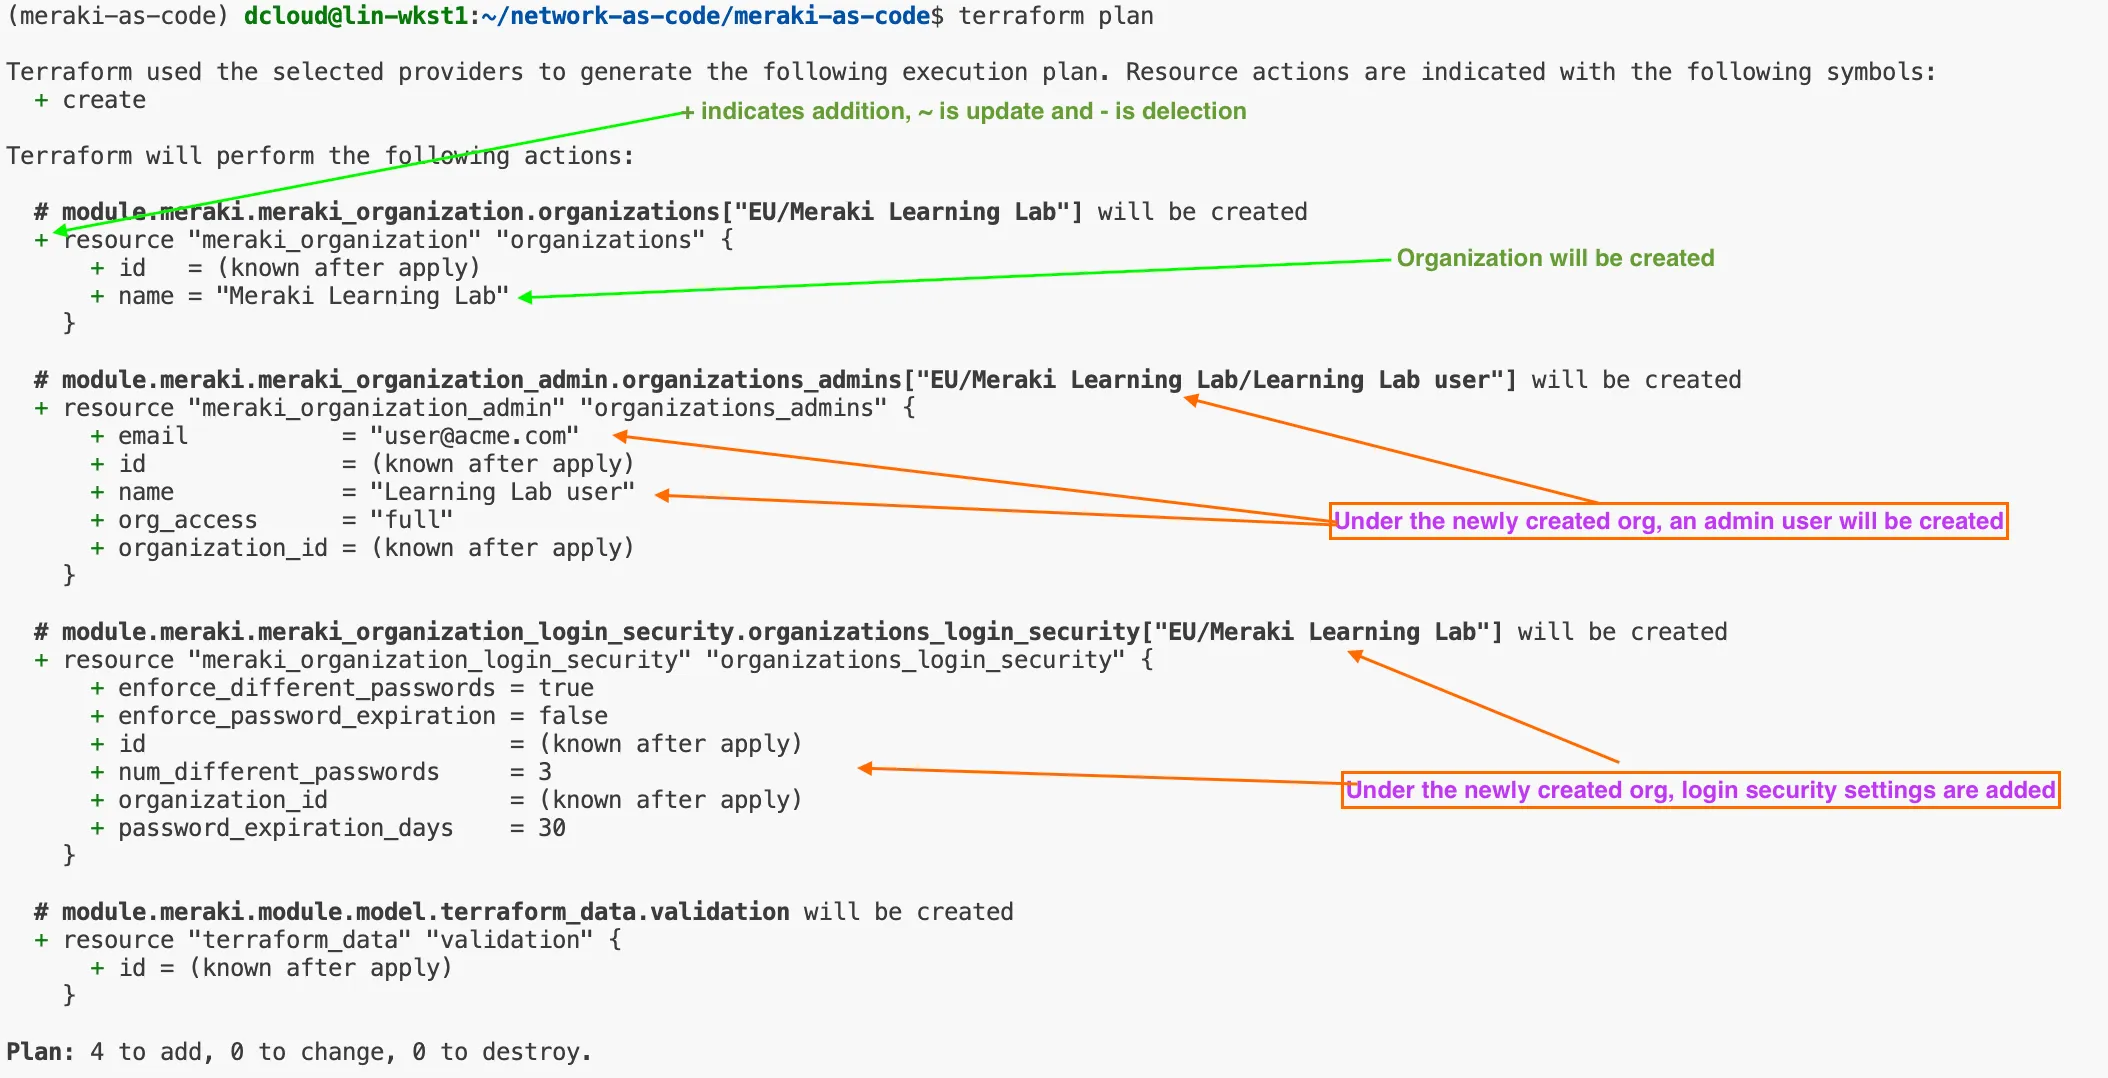
The plan output uses symbols to indicate what action Terraform will take on each resource:
+(Create) — A new resource will be added. This appears when Terraform detects a resource in your configuration that does not yet exist in the current state.-(Destroy) — An existing resource will be removed. This occurs when a resource is present in the state but no longer defined in your configuration.~(Update in-place) — An existing resource will be modified without being destroyed and recreated. Terraform will update only the changed attributes.-/+(Replace) — A resource must be destroyed and recreated because one or more changes require a new resource (e.g., an immutable attribute was modified).
In this plan, Terraform will create 4 new resources with no changes or deletions:
- Organization (
meraki_organization) — Creates a new Meraki organization named “Meraki Learning Lab”. - Organization Admin (
meraki_organization_admin) — Adds an admin user “Learning Lab user” with full organization access. - Login Security (
meraki_organization_login_security) — Configures the organization’s login security policy, including password expiration and reuse rules. - Data Validation (
terraform_data.validation) — An internal resource used by the module to validate the data model.
All four resources are marked with
+, confirming that this is a fresh deployment with nothing to update or destroy.Reviewing these symbols before running
terraform applyis a critical safety step — it confirms that the planned changes match your intent.Terraform plan analyzes your Terraform configuration files and compares them with the current state of your infrastructure. Based on this comparison, it creates an execution plan that tells you exactly what Terraform intends to do. In other words, it answers the question: “If I run terraform apply, what will happen?”
In our lab we expect output similar to:
Plan: 4 to add, 0 to change, 0 to destroy.During the initial deployment, you should expect to see only create/add actions in the Terraform plan. However, during any subsequent runs, Terraform may also show updates or removals, depending on what has changed in the configuration or in the environment. Terraform determines these changes by relying on its state file. The state file is a local (or remote) record that keeps track of all resources Terraform has created and their current attributes. It acts as the source of truth for Terraform, allowing it to understand:
- What resources already exist
- How they were configured previously
- What needs to be modified to match the new desired state
- Whether any resources should be removed because they no longer appear in the configuration
Because of this, the state file is crucial for enabling Terraform’s incremental, predictable, and idempotent behavior. In production environments, the state file is usually stored remotely (e.g., in S3, Azure Storage, or Terraform Cloud) to ensure consistency, secure access, and team collaboration.
Step 6: Deploy your first Configuration
Section titled “Step 6: Deploy your first Configuration”At this stage we will perform actual deployment using the terraform apply. This command instructs Terraform to execute the actions shown in the plan—creating, updating, or removing resources so that the infrastructure matches the desired state defined in your configuration files. During the apply phase, Terraform will:
- Interact with the Meraki API (using the provided key, hence it is important to have full write access to the Org)
- Create required resources
- Modify any configurations that changed
- Remove resources no longer defined
- Update the state file to reflect the new, actual state
If you run terraform apply without supplying a pre-generated plan, Terraform will automatically generate a new plan and ask for confirmation before proceeding.
For automated environments (e.g., CI/CD), the apply step is often executed with:
terraform apply -auto-approveIn this lab, you can simply execute:
terraform applyThat will re-generate the same plan (provided you made no configuration changes meanwhile), and prompt you for approval to perform actions. Enter yes.
terraform applyPlan: 4 to add, 0 to change, 0 to destroy.
Do you want to perform these actions? Terraform will perform the actions described above. Only 'yes' will be accepted to approve.
Enter a value: yesAfter successful execution, your infrastructure is fully aligned with the defined configuration. The deployment may take a few minutes as we are configuring a new Organization and network.
module.meraki.module.model.terraform_data.validation: Creating...module.meraki.module.model.terraform_data.validation: Creation complete after 0s [id=ec5c3720-7ef2-64e3-02eb-767c2e3b19d0]module.meraki.meraki_organization.organizations["EU/Meraki Learning Lab"]: Creating...module.meraki.meraki_organization.organizations["EU/Meraki Learning Lab"]: Creation complete after 1s [id=686235993220591726]module.meraki.meraki_organization_admin.organizations_admins["EU/Meraki Learning Lab/Learning Lab user"]: Creating...module.meraki.meraki_organization_login_security.organizations_login_security["EU/Meraki Learning Lab"]: Creating...module.meraki.meraki_organization_admin.organizations_admins["EU/Meraki Learning Lab/Learning Lab user"]: Creation complete after 2s [id=686235993220882816]module.meraki.meraki_organization_login_security.organizations_login_security["EU/Meraki Learning Lab"]: Creation complete after 2s [id=686235993220591726]
Apply complete! Resources: 4 added, 0 changed, 0 destroyed.
Once the creation is complete, navigate to your Meraki Dashboard. Login with the credentials that have same level access as API key used.
You should see your organization.