Task 5 - Configure everything as code
So far in this lab, we have:
- Concept and Tools: We have learned about the Meraki as Code concept, its benefits, and the tools we will be using in this lab.
- Prepare your environment: We have cloned the example repository, set environment variables, and familiarized ourselves with the data model structure.
- Working with Meraki Data Model: We have explored the data model structure, understood how templates and variables are organized, and how to modify them to fit our needs.
- Creating your first Organization: We have created an organization using the Meraki as code Data Model.
In this task, we will look at deploying other features of the Meraki using Meraki as Code Data Model.
- Create networks
- Add common network settings
- Add wireless settings and SSID to the network
- Add switch settings to the network
- Add appliance settings and vlans to the network
- Add appliance traffic shaping to the network
- Add firewall services to the network
Step 1: Create network and configure settings
Section titled “Step 1: Create network and configure settings”Go to your Code Server
On the Explorer in the left you can see, the
datafolder and some configurations are placed inlab-datafolder.Copy the file
02_configure_network.nac.yamlfromlab-datafolder to thedatafolder.Review the contents of the file and see if you can understand the YAML syntax for network and its settings.
meraki: domains: - name: EU administrator: name: admin organizations: - name: Meraki Learning Lab managed: true networks: - name: Amsterdam-Network-1 product_types: - appliance - switch - wireless time_zone: Europe/Amsterdam notes: cleu_network_notes tags: - cleu settings: local_status_page_enabled: true remote_status_page: true secure_port: false local_status_page_authentication: username: cleu_user password: !env secret_password named_vlans: true snmp: access: users users: - username: cleu_user passphrase: !env secret_password syslog_servers: - host: 1.2.3.4 port: 514 roles: - Switch Event log - Air Marshal events - Flows - URLs - Wireless Event log - Appliance Event logThe Data Model Syntax for Networks can be referred at General Network Settings
Summary: Building on the organization created earlier, this YAML adds a network named Amsterdam-Network-1 with appliance, switch, and wireless product types. It sets the time zone to Europe/Amsterdam, applies a cleu tag, and enables local and remote status pages with authentication. SNMP is configured with user-based access, and syslog forwarding is set up to send switch events, Air Marshal events, flows, URLs, wireless events, and appliance events to 1.2.3.4:514. Named VLANs are also enabled for the network. Notice the !env secret_password syntax — this is a custom YAML tag that reads the value of the secret_password environment variable at runtime, keeping sensitive credentials out of your data model files and version control.
Step 2: Add wireless settings and SSID
Section titled “Step 2: Add wireless settings and SSID”Copy the file
03_add_wireless.nac.yamlfromlab-datafolder to thedatafolder.Review the contents of the file and see if you can understand the YAML syntax for wireless settings and SSIDs.
meraki: domains: - name: EU administrator: name: admin organizations: - name: Meraki Learning Lab managed: true networks: - name: Amsterdam-Network-1 wireless: settings: upgrade_strategy: minimizeUpgradeTime meshing: false ssids: - name: Corp auth_mode: 8021x-radius available_on_all_aps: true band_selection: Dual band operation with Band Steering default_vlan_id: 10 dot11r: enabled: true dot11w: enabled: true required: false enabled: true encryption_mode: wpa-eap firewall_l3_firewall_rules: allow_lan_access: true ip_assignment_mode: Bridge mode lan_isolation: false radius: accounting: true accounting_servers: - host: 2.3.4.5 port: 1813 secret: !env secret_password - host: 2.3.4.6 port: 1813 secret: !env secret_password attribute_for_group_policies: Filter-Id coa: false override: true servers: - host: 2.3.4.5 port: 1812 secret: !env secret_password - host: 2.3.4.6 port: 1812 secret: !env secret_password testing: true ssid_number: '0' traffic_shaping_rules: traffic_shaping: true default_rules: true use_vlan_tagging: true visible: true wpa_encryption_mode: WPA2 onlyThe Data Model Syntax for Wireless can be referred at SSID Base Configuration
Summary: This YAML adds wireless configuration to Amsterdam-Network-1. It sets the upgrade strategy to minimize upgrade time and disables meshing. An SSID named Corp is created using 802.1X RADIUS authentication with WPA2-EAP encryption in bridge mode on VLAN 10. Two RADIUS servers (2.3.4.5 and 2.3.4.6) are configured for both authentication (port 1812) and accounting (port 1813), with secrets read from the secret_password environment variable. The SSID enables 802.11r (fast roaming) and 802.11w (management frame protection), is available on all access points, uses dual band with band steering, and has VLAN tagging and traffic shaping enabled.
Step 3: Add switch settings
Section titled “Step 3: Add switch settings”Copy the file
04_switch_settings.nac.yamlfromlab-datafolder to thedatafolder.Review the contents of the file and see if you can understand the YAML syntax for switch settings and access policies.
meraki: domains: - name: EU administrator: name: admin organizations: - name: Meraki Learning Lab managed: true networks: - name: Amsterdam-Network-1 switch: access_policies: - name: 'Wired Access Policy' radius_servers: - host: 2.3.4.5 port: 1812 secret: !env secret_password radius_accounting_servers: - host: 2.3.4.5 port: 1813 secret: !env secret_password radius_accounting: true radius_coa_support: true radius_testing: true radius_group_attribute: '11' host_mode: Multi-Auth voice_vlan_clients: true access_policy_type: Hybrid authentication radius: re_authentication_interval: 86400 dot1x_control_direction: both url_redirect_walled_garden: false settings: vlan: 999 use_combined_power: false uplink_client_sampling: true mac_blocklist: false mtu: default_mtu_size: 9126 routing_multicast: default_settings: igmp_snooping: true flood_unknown_multicast_traffic: falseThe Data Model Syntax for Switch can be referred at Switch Settings
Summary: This YAML adds switch configuration to Amsterdam-Network-1. It creates a wired access policy named Wired Access Policy using hybrid authentication in multi-auth host mode with RADIUS server 2.3.4.5 for both authentication (port 1812) and accounting (port 1813). The policy enables RADIUS CoA support, testing, and sets a re-authentication interval of 86400 seconds (24 hours) with bidirectional 802.1X control. Switch settings assign the default VLAN to 999, disable combined power and MAC blocklist, and enable uplink client sampling. The MTU is set to 9126, and multicast routing is configured with IGMP snooping enabled and unknown multicast flooding disabled.
Step 4: Add appliance settings, VLANs, and traffic shaping
Section titled “Step 4: Add appliance settings, VLANs, and traffic shaping”Copy the file
05_add_firewall_sdwan_settings.nac.yamlfromlab-datafolder to thedatafolder.Review the contents of the file and see if you can understand the YAML syntax for appliance VLANs and traffic shaping rules.
meraki: domains: - name: EU administrator: name: admin organizations: - name: Meraki Learning Lab managed: true networks: - name: Amsterdam-Network-1 time_zone: Europe/Amsterdam appliance: settings: client_tracking_method: 'MAC address' deployment_mode: routed vlans: - vlan_id: 10 name: 'Data' subnet: 10.1.10.0/24 appliance_ip: 10.1.10.1 dhcp_handling: 'Run DHCP server' mandatory_dhcp: false - vlan_id: 20 name: 'Voice' subnet: 10.1.20.0/24 appliance_ip: 10.1.20.1 dhcp_handling: 'Run DHCP server' mandatory_dhcp: false - vlan_id: 999 name: 'Infra' subnet: 10.1.255.0/24 appliance_ip: 10.1.255.1 dns_nameservers: opendns dhcp_handling: 'Run a DHCP server' dhcp_lease_time: '1 day' dhcp_boot_options: false mandatory_dhcp: false traffic_shaping: global_bandwidth_limits: limit_up: 5000 limit_down: 9000 rules: rules: - name: Rule 01 definitions: - type: applicationCategory value: 'meraki:layer7/category/24' - type: application value: meraki:layer7/application/332 per_client_bandwidth_limits: settings: custom bandwidth_limits: limit_up: 1000 limit_down: 1000 dscp_tag_value: 10 priority: high - name: Rule 02 definitions: - type: application value: meraki:layer7/application/332 per_client_bandwidth_limits: settings: ignore dscp_tag_value: 18 priority: high default_rules: falseThe Data Model Syntax for Appliance can be referred at Appliance Settings
Summary: This YAML configures the MX appliance for Amsterdam-Network-1 in routed deployment mode with MAC address client tracking. Three VLANs are defined: Data (VLAN 10, 10.1.10.0/24), Voice (VLAN 20, 10.1.20.0/24), and Infra (VLAN 999, 10.1.255.0/24) — each with its own DHCP server and gateway address. The Infra VLAN additionally uses OpenDNS nameservers with a 1-day DHCP lease. Traffic shaping is configured with global bandwidth limits of 5 Mbps up and 9 Mbps down, along with two high-priority rules: Rule 01 targets the “Databases & cloud services” category and Amazon RDS with custom per-client limits of 1 Mbps each direction, while Rule 02 targets Amazon RDS specifically with no per-client limits enforced.
Step 5: Validate your Configuration
Section titled “Step 5: Validate your Configuration”Now that all four YAML files are in the data/ folder, run nac-validate to check for syntax and semantic errors across the entire data model before planning.
cd /home/dcloud/network-as-code/meraki-as-code/nac-validate --non-strict -s schema.yaml -r rules/ data/You should see output as below.
(meraki-as-code) dcloud@lin-wkst1:~/network-as-code/meraki-as-code$ nac-validate --non-strict -s schema.yaml -r rules/ data/(meraki-as-code) dcloud@lin-wkst1:~/network-as-code/meraki-as-code$If validation passes with no errors, you are ready to proceed with the plan. If you see any syntax or semantic errors, refer back to the validation exercise in the previous task for guidance on how to interpret and fix them.
Step 6: Plan your changes
Section titled “Step 6: Plan your changes”Use terraform plan to preview the changes Terraform will make based on all the YAML files in your data/ directory. Since we have added network settings, wireless, switch, and appliance configurations, you should expect to see a significantly larger number of resources compared to the initial organization deployment.
Run the command
terraform planTerminal window terraform planReview the plan output. You should see multiple resources being created across different Meraki resource types — networks, wireless SSIDs, switch access policies, appliance VLANs, traffic shaping rules, and more.
module.meraki.module.model.terraform_data.validation: Refreshing state... [id=a1e80286-4871-e625-bb70-9fe4c7a5d978]module.meraki.meraki_organization.organizations["EU/Meraki Learning Lab"]: Refreshing state... [id=686235993220591779]module.meraki.meraki_organization_login_security.organizations_login_security["EU/Meraki Learning Lab"]: Refreshing state... [id=686235993220591779]module.meraki.meraki_organization_admin.organizations_admins["EU/Meraki Learning Lab/Learning Lab user"]: Refreshing state... [id=686235993220883935]Terraform used the selected providers to generate the following execution plan. Resource actions are indicated with the following symbols:+ createTerraform will perform the following actions:# module.meraki.meraki_appliance_settings.networks_appliance_settings["EU/Meraki Learning Lab/Amsterdam-Network-1"] will be created+ resource "meraki_appliance_settings" "networks_appliance_settings" {+ client_tracking_method = "MAC address"+ deployment_mode = "routed"+ id = (known after apply)+ network_id = (known after apply)}# module.meraki.meraki_appliance_traffic_shaping.networks_appliance_traffic_shaping["EU/Meraki Learning Lab/Amsterdam-Network-1"] will be created+ resource "meraki_appliance_traffic_shaping" "networks_appliance_traffic_shaping" {+ global_bandwidth_limit_down = 9000+ global_bandwidth_limit_up = 5000+ id = (known after apply)+ network_id = (known after apply)}# module.meraki.meraki_appliance_traffic_shaping_rules.networks_appliance_traffic_shaping_rules["EU/Meraki Learning Lab/Amsterdam-Network-1"] will be created+ resource "meraki_appliance_traffic_shaping_rules" "networks_appliance_traffic_shaping_rules" {+ default_rules_enabled = false+ id = (known after apply)+ network_id = (known after apply)+ rules = [+ {+ definitions = [+ {+ type = "applicationCategory"+ value = "meraki:layer7/category/24"},+ {+ type = "application"+ value = "meraki:layer7/application/332"},]+ dscp_tag_value = 10+ per_client_bandwidth_limit_down = 1000+ per_client_bandwidth_limit_settings = "custom"+ per_client_bandwidth_limit_up = 1000+ priority = "high"},+ {+ definitions = [+ {+ type = "application"+ value = "meraki:layer7/application/332"},]+ dscp_tag_value = 18+ per_client_bandwidth_limit_settings = "ignore"+ priority = "high"},]}<output truncated># module.meraki.meraki_wireless_ssid_traffic_shaping_rules.networks_wireless_ssids_traffic_shaping_rules["EU/Meraki Learning Lab/Amsterdam-Network-1/Corp"] will be created+ resource "meraki_wireless_ssid_traffic_shaping_rules" "networks_wireless_ssids_traffic_shaping_rules" {+ default_rules_enabled = true+ id = (known after apply)+ network_id = (known after apply)+ number = "0"+ traffic_shaping_enabled = true}Plan: 22 to add, 0 to change, 0 to destroy.───────────────────────────────────────────────────────────────────────────────────────────────────────────────────────────────────────────────────────────────────────────────────────────────────────Note: You didn't use the -out option to save this plan, so Terraform can't guarantee to take exactly these actions if you run "terraform apply" now.Check the plan summary at the bottom of the output. It will show something similar to:
Plan: 22 to add, 0 to change, 0 to destroy.Since this is a new deployment on top of the existing organization, all resources should be marked with
+(create). There should be no changes or deletions if you have not modified the previously deployed organization configuration.
Step 7: Deploy your Configuration
Section titled “Step 7: Deploy your Configuration”Once you have reviewed the plan and confirmed the changes match your intent, deploy the configuration using terraform apply.
Run the apply command:
Terminal window terraform applyTerraform will regenerate the plan and prompt you for confirmation. Review the plan summary and enter
yesto proceed.Do you want to perform these actions?Terraform will perform the actions described above.Only 'yes' will be accepted to approve.Enter a value: yesWait for the deployment to complete. Terraform will create each resource and display its progress:
module.meraki.meraki_network.organizations_networks["EU/Meraki Learning Lab/Amsterdam-Network-1"]: Creating...module.meraki.meraki_network.organizations_networks["EU/Meraki Learning Lab/Amsterdam-Network-1"]: Creation complete after 2s [id=L_686235993220660247]module.meraki.meraki_network_settings.networks_settings["EU/Meraki Learning Lab/Amsterdam-Network-1"]: Creating...module.meraki.meraki_network_snmp.networks_snmp["EU/Meraki Learning Lab/Amsterdam-Network-1"]: Creating...module.meraki.meraki_appliance_settings.networks_appliance_settings["EU/Meraki Learning Lab/Amsterdam-Network-1"]: Creating...module.meraki.meraki_appliance_vlans_settings.networks_appliance_vlans_settings["EU/Meraki Learning Lab/Amsterdam-Network-1"]: Creating...module.meraki.meraki_switch_mtu.networks_switch_mtu["EU/Meraki Learning Lab/Amsterdam-Network-1"]: Creating...module.meraki.meraki_wireless_settings.networks_wireless_settings["EU/Meraki Learning Lab/Amsterdam-Network-1"]: Creating...module.meraki.meraki_network_syslog_servers.networks_syslog_servers["EU/Meraki Learning Lab/Amsterdam-Network-1"]: Creating...module.meraki.meraki_switch_routing_multicast.networks_switch_routing_multicast["EU/Meraki Learning Lab/Amsterdam-Network-1"]: Creating...module.meraki.meraki_switch_access_policy.networks_switch_access_policies["EU/Meraki Learning Lab/Amsterdam-Network-1/Wired Access Policy"]: Creating...module.meraki.meraki_wireless_ssid.networks_wireless_ssids["EU/Meraki Learning Lab/Amsterdam-Network-1/Corp"]: Creating...module.meraki.meraki_network_settings.networks_settings["EU/Meraki Learning Lab/Amsterdam-Network-1"]: Creation complete after 2s [id=L_686235993220660247]module.meraki.meraki_switch_settings.networks_switch_settings["EU/Meraki Learning Lab/Amsterdam-Network-1"]: Creating...module.meraki.meraki_appliance_settings.networks_appliance_settings["EU/Meraki Learning Lab/Amsterdam-Network-1"]: Creation complete after 2s [id=L_686235993220660247]module.meraki.meraki_network_snmp.networks_snmp["EU/Meraki Learning Lab/Amsterdam-Network-1"]: Creation complete after 3s [id=L_686235993220660247]module.meraki.meraki_appliance_vlans_settings.networks_appliance_vlans_settings["EU/Meraki Learning Lab/Amsterdam-Network-1"]: Creation complete after 3s [id=L_686235993220660247]module.meraki.meraki_appliance_vlan.networks_appliance_vlans["EU/Meraki Learning Lab/Amsterdam-Network-1/10"]: Creating...module.meraki.meraki_appliance_vlan.networks_appliance_vlans["EU/Meraki Learning Lab/Amsterdam-Network-1/20"]: Creating...module.meraki.meraki_appliance_vlan.networks_appliance_vlans["EU/Meraki Learning Lab/Amsterdam-Network-1/999"]: Creating...module.meraki.meraki_switch_mtu.networks_switch_mtu["EU/Meraki Learning Lab/Amsterdam-Network-1"]: Creation complete after 4s [id=L_686235993220660247]module.meraki.meraki_wireless_settings.networks_wireless_settings["EU/Meraki Learning Lab/Amsterdam-Network-1"]: Creation complete after 4s [id=L_686235993220660247]module.meraki.meraki_network_syslog_servers.networks_syslog_servers["EU/Meraki Learning Lab/Amsterdam-Network-1"]: Creation complete after 4s [id=L_686235993220660247]module.meraki.meraki_switch_routing_multicast.networks_switch_routing_multicast["EU/Meraki Learning Lab/Amsterdam-Network-1"]: Creation complete after 5s [id=L_686235993220660247]module.meraki.meraki_switch_access_policy.networks_switch_access_policies["EU/Meraki Learning Lab/Amsterdam-Network-1/Wired Access Policy"]: Creation complete after 6s [id=1]module.meraki.meraki_wireless_ssid.networks_wireless_ssids["EU/Meraki Learning Lab/Amsterdam-Network-1/Corp"]: Creation complete after 6s [id=0]module.meraki.meraki_wireless_ssid_traffic_shaping_rules.networks_wireless_ssids_traffic_shaping_rules["EU/Meraki Learning Lab/Amsterdam-Network-1/Corp"]: Creating...module.meraki.meraki_wireless_ssid_l3_firewall_rules.networks_wireless_ssids_firewall_l3_firewall_rules["EU/Meraki Learning Lab/Amsterdam-Network-1/Corp"]: Creating...module.meraki.meraki_switch_settings.networks_switch_settings["EU/Meraki Learning Lab/Amsterdam-Network-1"]: Creation complete after 5s [id=L_686235993220660247]module.meraki.meraki_appliance_vlan.networks_appliance_vlans["EU/Meraki Learning Lab/Amsterdam-Network-1/10"]: Creation complete after 4s [id=10]module.meraki.meraki_appliance_vlan.networks_appliance_vlans["EU/Meraki Learning Lab/Amsterdam-Network-1/20"]: Creation complete after 4s [id=20]module.meraki.meraki_appliance_vlan.networks_appliance_vlans["EU/Meraki Learning Lab/Amsterdam-Network-1/999"]: Creation complete after 5s [id=999]module.meraki.meraki_appliance_traffic_shaping.networks_appliance_traffic_shaping["EU/Meraki Learning Lab/Amsterdam-Network-1"]: Creating...module.meraki.meraki_appliance_vlan_dhcp.networks_appliance_vlans_dhcp["EU/Meraki Learning Lab/Amsterdam-Network-1/10"]: Creating...module.meraki.meraki_appliance_vlan_dhcp.networks_appliance_vlans_dhcp["EU/Meraki Learning Lab/Amsterdam-Network-1/999"]: Creating...module.meraki.meraki_appliance_vlan_dhcp.networks_appliance_vlans_dhcp["EU/Meraki Learning Lab/Amsterdam-Network-1/20"]: Creating...module.meraki.meraki_appliance_traffic_shaping_rules.networks_appliance_traffic_shaping_rules["EU/Meraki Learning Lab/Amsterdam-Network-1"]: Creating...module.meraki.meraki_wireless_ssid_traffic_shaping_rules.networks_wireless_ssids_traffic_shaping_rules["EU/Meraki Learning Lab/Amsterdam-Network-1/Corp"]: Creation complete after 2s [id=0]module.meraki.meraki_wireless_ssid_l3_firewall_rules.networks_wireless_ssids_firewall_l3_firewall_rules["EU/Meraki Learning Lab/Amsterdam-Network-1/Corp"]: Creation complete after 3s [id=0]module.meraki.meraki_appliance_traffic_shaping.networks_appliance_traffic_shaping["EU/Meraki Learning Lab/Amsterdam-Network-1"]: Creation complete after 1s [id=L_686235993220660247]module.meraki.meraki_appliance_vlan_dhcp.networks_appliance_vlans_dhcp["EU/Meraki Learning Lab/Amsterdam-Network-1/999"]: Creation complete after 1s [id=999]module.meraki.meraki_appliance_vlan_dhcp.networks_appliance_vlans_dhcp["EU/Meraki Learning Lab/Amsterdam-Network-1/20"]: Creation complete after 2s [id=20]module.meraki.meraki_appliance_vlan_dhcp.networks_appliance_vlans_dhcp["EU/Meraki Learning Lab/Amsterdam-Network-1/10"]: Creation complete after 2s [id=10]module.meraki.meraki_appliance_traffic_shaping_rules.networks_appliance_traffic_shaping_rules["EU/Meraki Learning Lab/Amsterdam-Network-1"]: Creation complete after 3s [id=L_686235993220660247]Apply complete! Resources: 22 added, 0 changed, 0 destroyed.Once complete, you should see a summary similar to:
Apply complete! Resources: 22 added, 0 changed, 0 destroyed.Navigate to your Meraki Dashboard and verify the deployed configuration:
- The
Amsterdam-Network-1network should appear under your organization - The network should show appliance, switch, and wireless product types
- Wireless SSID
Corpshould be configured with 802.1X RADIUS authentication - Switch access policy
Wired Access Policyshould be visible - Appliance VLANs (Data, Voice, Infra) should be created
- Traffic shaping rules should be applied
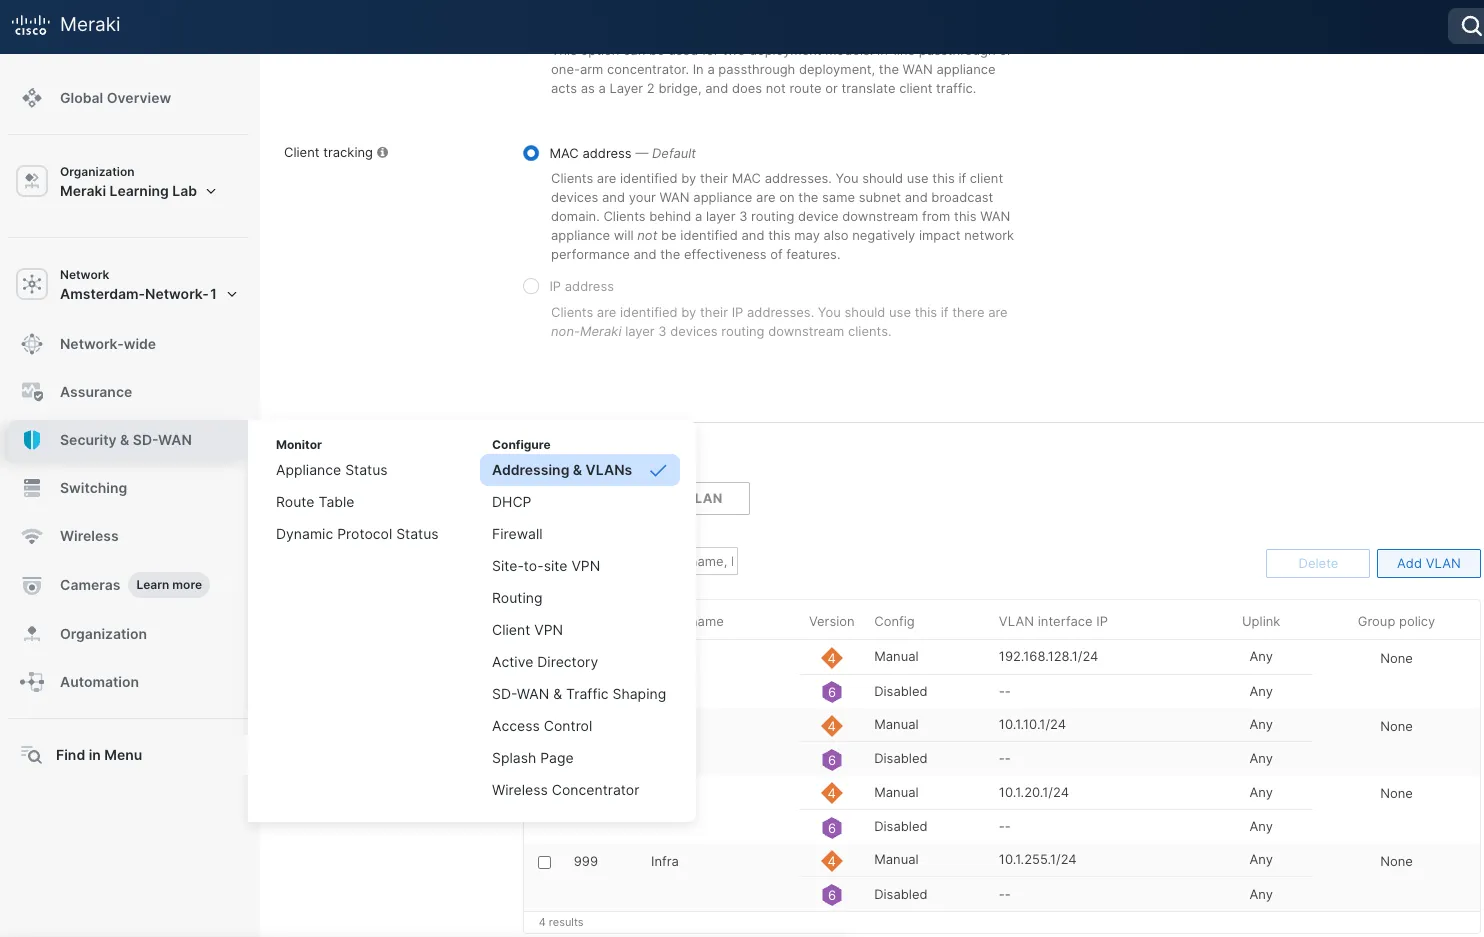
- The
Step 8: Post-Deployment Testing
Section titled “Step 8: Post-Deployment Testing”In this step you will perform a post-deployment testing to confirm every intent defined in Data Model YAML is actually configured in the Meraki dashboard.
- Run the following command to execute
nac-teston your YAML.
cd /home/dcloud/network-as-code/meraki-as-code/nac-test --templates tests/ --data data/ --output test_resultsThe nac-test command takes 3 mandatory arguments:
--templates tests/— Path to the test templates directory. These are Robot Framework test files that define what to verify against the Meraki Dashboard.--data data/— Path to the YAML data model directory. nac-test reads the intended configuration from these files and compares it against the actual state in the dashboard.--output test_results— Path where test results are written. This includes an HTML report (report.html), a detailed log (log.html), and machine-readable XML output.
You will see output as below
Initialized logging in test_results/pabot_resultsRobot Framework remote server at 127.0.0.1:58083 started.Storing .pabotsuitenames file2026-03-13 05:15:27.956553 [PID:395879] [0] [ID:0] EXECUTING Test Results.Config.Networks List2026-03-13 05:15:27.973779 [PID:395882] [1] [ID:1] EXECUTING Test Results.Config.Networks Wireless Ssid List2026-03-13 05:15:27.974059 [PID:395880] [2] [ID:2] EXECUTING Test Results.Config.Organizations Admin2026-03-13 05:15:29.385848 [PID:395880] [2] [ID:2] PASSED Test Results.Config.Organizations Admin in 1.4 seconds2026-03-13 05:15:30.283504 [PID:395882] [1] [ID:1] PASSED Test Results.Config.Networks Wireless Ssid List in 2.3 seconds2026-03-13 05:15:32.983471 [PID:395879] [0] [ID:0] still running Test Results.Config.Networks List after 5.0s2026-03-13 05:15:39.800193 [PID:395879] [0] [ID:0] PASSED Test Results.Config.Networks List in 11.8 seconds10 tests, 10 passed, 0 failed, 0 skipped.===================================================Output: /home/dcloud/network-as-code/meraki-as-code/test_results/output.xmlXUnit: /home/dcloud/network-as-code/meraki-as-code/test_results/xunit.xmlLog: /home/dcloud/network-as-code/meraki-as-code/test_results/log.htmlReport: /home/dcloud/network-as-code/meraki-as-code/test_results/report.htmlFinalizing Pabot execution...Stopping PabotLib processRobot Framework remote server at 127.0.0.1:58083 stopped.PabotLib process stoppedTotal testing: 15.50 secondsElapsed time: 12.53 secondsLogs flushed successfully.Browse to the output folder
test_resultsin your Code ServerRight click on the
log.htmlfile and clickdownload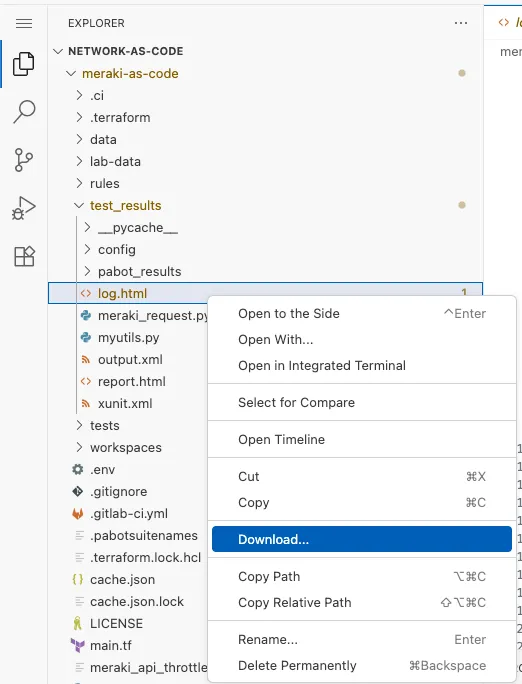
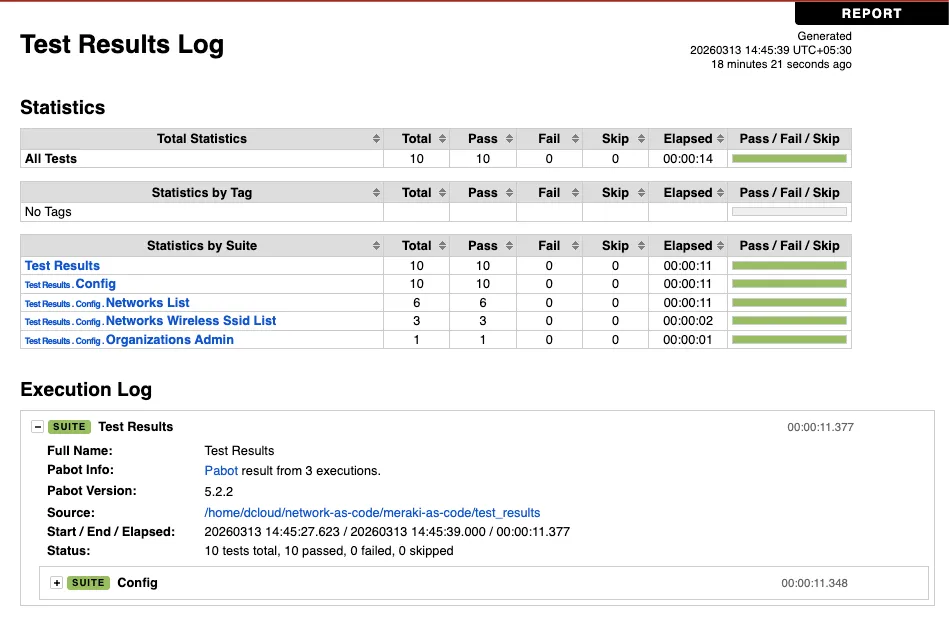
Find the downloaded file in your laptop and open it with browser. You will see a HTML page as below.
You can click on any test to drill down and look in to the details of the tested parameters
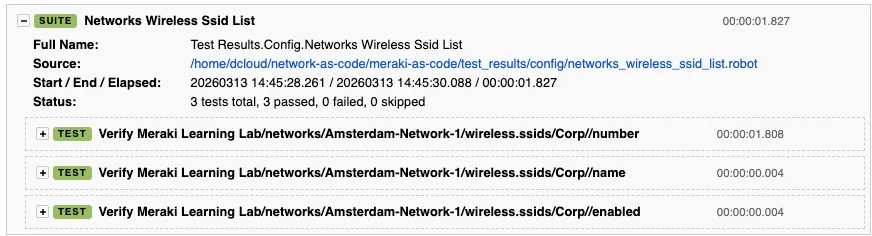
If all the tests are green, it confirms that intent in our Data Model matches with the configuration in Meraki Dashboard.